facts win cases
claw the facts
Witness by witness; issue by issue; fact by fact – use BACKSHEET to visualise your trial act by act; scene by scene.
The big idea
A trial lawyer tells a story through the medium of witnesses to persuade a fact finder in much the same way a playwright uses characters’ dialogue to explain narrative to an audience and carry the action.
A playwright aggregates dialogue in a play by ‘Act’ & ‘Scene’ – ‘Acts’ can be thought of as a ‘story within the story’.
The Big Idea in BACKSHEET, the Insight, is that in a trial, ‘a story within the story’ is an ‘issue’ for proof!
The playwright wraps a story into Acts and Scenes – the trial lawyer too can tell a story ‘Act by Act’ by wrapping individual ‘issues’ for proof into individual ‘Act’s.
BACKSHEET is a digital tool designed to divide evidence into scenes, then group scenes together into ‘Acts’ – each ‘Act’ is an issue for proof to succeed at trial; the Big Idea is that the trial lawyer aggregates the evidence into ‘scenes’ to carry the narrative, then draws on scenes to frame an ‘issue’ (i.e. an ’Act’) and ultimately, the ‘issues’ (the ‘Acts’ and ‘Scenes’) comprise a persuasive story arc, to present to a fact-finder and succeed at proof!
Key features
The key features of BACKSHEET are a timeline and the use of the timeline to view a case through three dimensions – (location) where a character (witness) is when an event took place, (the ‘issues’) the issues for proof, which the witnesses were party to at a certain place and time and, the life of a witness or an exhibit traced throughout the life of the case on the timeline; you can create a story arc for a character or exhibit, from beginning to end, to tell your client’s story. And you can share that digital work product with a colleague who is a subscriber at the press of a button.


Frequently asked questions
Our Frequently Asked Questions (FAQ) is your go-to resource for quick and comprehensive answers. We’ve gathered the most common inquiries to provide you with instant solutions and helpful insights. Whether you’re seeking product details, troubleshooting guidance, or simply want to learn more.
The current development of the app does not support smaller screen sizes, such as mobile devices. For the best experience it is recommended that you use a tablet, laptop or desktop device.
The app has a ‘sidebar’ coloured black, a ‘headline’ bar and a main body with text.
The sidebar on the left is coloured black with pink icons and white coloured text.
The sidebar is available to the user no matter what page the app is ‘in’ – at present the sidebar functions as a conventional dashboard allowing the user to ‘toggle’ between the functionality offered by the app, in time a more conventional dashboard will be added to the app.
At the top is the BACKSHEET logo and ‘BACKSHEET’ – both are written in the pink colour of a Barrister’s ribbon – this is the app’s logo; the logo is not ‘hot’ and you will not use it to access any of the app’s functionality.
What do the ‘sidebar’ headings mean?
At the top left of the of sidebar is the logo – access the functionality of the app under the logo; ‘Dashboard’; ‘Cases’; ‘Messages’ & ‘Notifications’
In time, the app will change to let the user access the app through a conventional ‘dashboard’ but at present it is thought best to let the user get straight into the functionality of the app immediately on accessing the app.
Create a character.
Go to ‘Add a Character’.
In the app – ‘Characters’ or the ‘Cast of Characters’ are the witnesses in your case.
You may of course add yourself into the cast of characters in the case so that you can record your own input into the case, i.e. consultations with the client or expert witnesses and court appearances required and ‘notes to self’ recorded in your own character
The characters are referred to as a ‘cast of characters’ because of the idea that you are casting a character as a witness in your case – the court lawyer tells their client’s story to the fact-finder through the medium of the evidence, i.e. the evidence of witnesses given from the witness box.
It is important to know how the ‘characters’ relate to the ‘timeline’.
Understanding characters – the cast of characters is divided into the following –
- ‘leading character’;
- ‘supporting characters’;
- ‘expert witness’;
- ‘extras (not witnesses);
The cast of characters let the user do a number of things on the app.
Every character is put into one of these four – a leading character, a supporting character an expert character or an extra.
The reason for four categories is two-fold: usually in a case there are one or two characters who are the primary focus for the evidence – he or she carries the action and the arc of the narrative – that is the leading character. The other reason for the different groupings (a leading character, supporting character etc) is to allow the user to un-clutter the timeline by filtering characters by their role, i.e. the user can look at only the leading characters or supporting characters etc which is a very useful tool to filter through the facts from a high level perspective.
You will decide who will carry the narrative and action – supporting characters are important but not as central to the narrative or action as leading characters but (supporting characters) do help carry the storyline.
The ‘extras’ carry neither the action nor the narrative – if you do not wish to put a character on the timeline but you do want access to their evidence, make the character (witness) an ‘extra’ and they will not appear on the timeline. At a later date, you wish to put the ‘extra’ on the timeline, simply go into their character and add a date.
The expert witness – mixing a screenplay and a court case – offers an opinion as to the significance of the action and the narrative rather than being a witness to fact.
Putting that all together – there are some witnesses who are part of the action and you will want to put those characters on the time line, these are the leading character, the supporting character and if you have an expert witness offering an opinion then an ‘expert’ character can be added.
The contribution of a character to a case i.e. the evidential significance of the evidence of a character may not be significant and so, you may not want to have the evidence of that character on the time-line – the way to deal with this is to create a character as an ‘extra’ which means for completeness sake the evidence is in the app but not on the time-line.
However, at some later point should the evidence of the character presently in the system as an ‘extra’ be re-visited and judged to be more significant, the user can attribute a date and time to the character, then the user will promote the character to a ‘supporting character’ etc. by going to the character’s profile and changing his status from ‘extra’ to ‘supporting character etc.
Are all the Characters in the Cast of Characters on the timeline?
No. The character type ‘extras’ is there because you do not want to put a character on the timeline at the moment you create that character but you do want to have it in the app.
If that is the case – make the character an ‘extra’ and it will automatically be put into the app but not be put on the timeline.
When you enter the app you are taken to the ‘Dashboard’ – to build a case, go to the box below ‘Dashboard’ on the left hand side of the app titled ‘Cases’.
After you click on ‘Cases’ you will see on the right at the top two icons – one to log out the other to go to notifications.
Under that from left to right there is a pink box with “+Create a new case” and across from that a search box with ‘search by title.
Under that there are four columns – ‘title’; ‘description’; ‘created on’ and ‘Actions’ – under the ‘Actions’ box there is an option to go to the case (“view case”) and an option to delete a case (‘Delete’).
The columns – ‘title’; ‘description’; ‘created on’ and ‘Actions’ represent the title of a case you have created, a description of the case (this is taken from the description box under the case name attributed to a case when building a case); ‘created on’ effectively the date and time on which the case was created; ‘Actions’ is what has been done in the case by the user or an invited contributor to the case (someone a subscriber invites in to work on a case with him or her).
So, to start, to create a case – begin by clicking on “+Create a new case”.
When you click on Create a new case a box appears with a banner (a top line saying) “Add a New Case” and a cross at the far right of the banner – if you press the x (in the black circle) of the Create a new case you will be taken back to your list of cases in the ‘Cases’ window.
When you click on ‘+Create a new case’ a box appears inviting you to create a case by naming the case and describing the case – add a title and add a description for the case (the description of the case may be the legal ingredients of the case needed to prove the issues or it could be your ‘theory of the case’ or your ‘trial plan’ or any other description that works for you.
Add a ‘Title’ and add a ‘Description’ and click ‘save’.
You now have a ‘case’.
The case you have created is listed under ‘cases’ accessed via the black coloured left side icon with ‘cases’ beside it and, is listed at the top of the row of columns in the main text.
The lists are listed most recent first, unless that order is reversed using the ‘Created On’ column.
Note: a user can change the (horizontal) order of the column titles by clicking and dragging the title of the column. So, you could have the first column as the date ‘Created On’ if you choose to do so.
Once you create more cases these too will be listed in date order under the ‘cases’ tab on the left side of the app.
If you are in cases, you will see the case you have just created.
Click ‘View Case’ which will take you to a new window where you will see the title of your case, the description of your case and under that, there is a banner which states:
“Start by adding your cast of characters or uploading your documents. The other features will be activated once completed.”
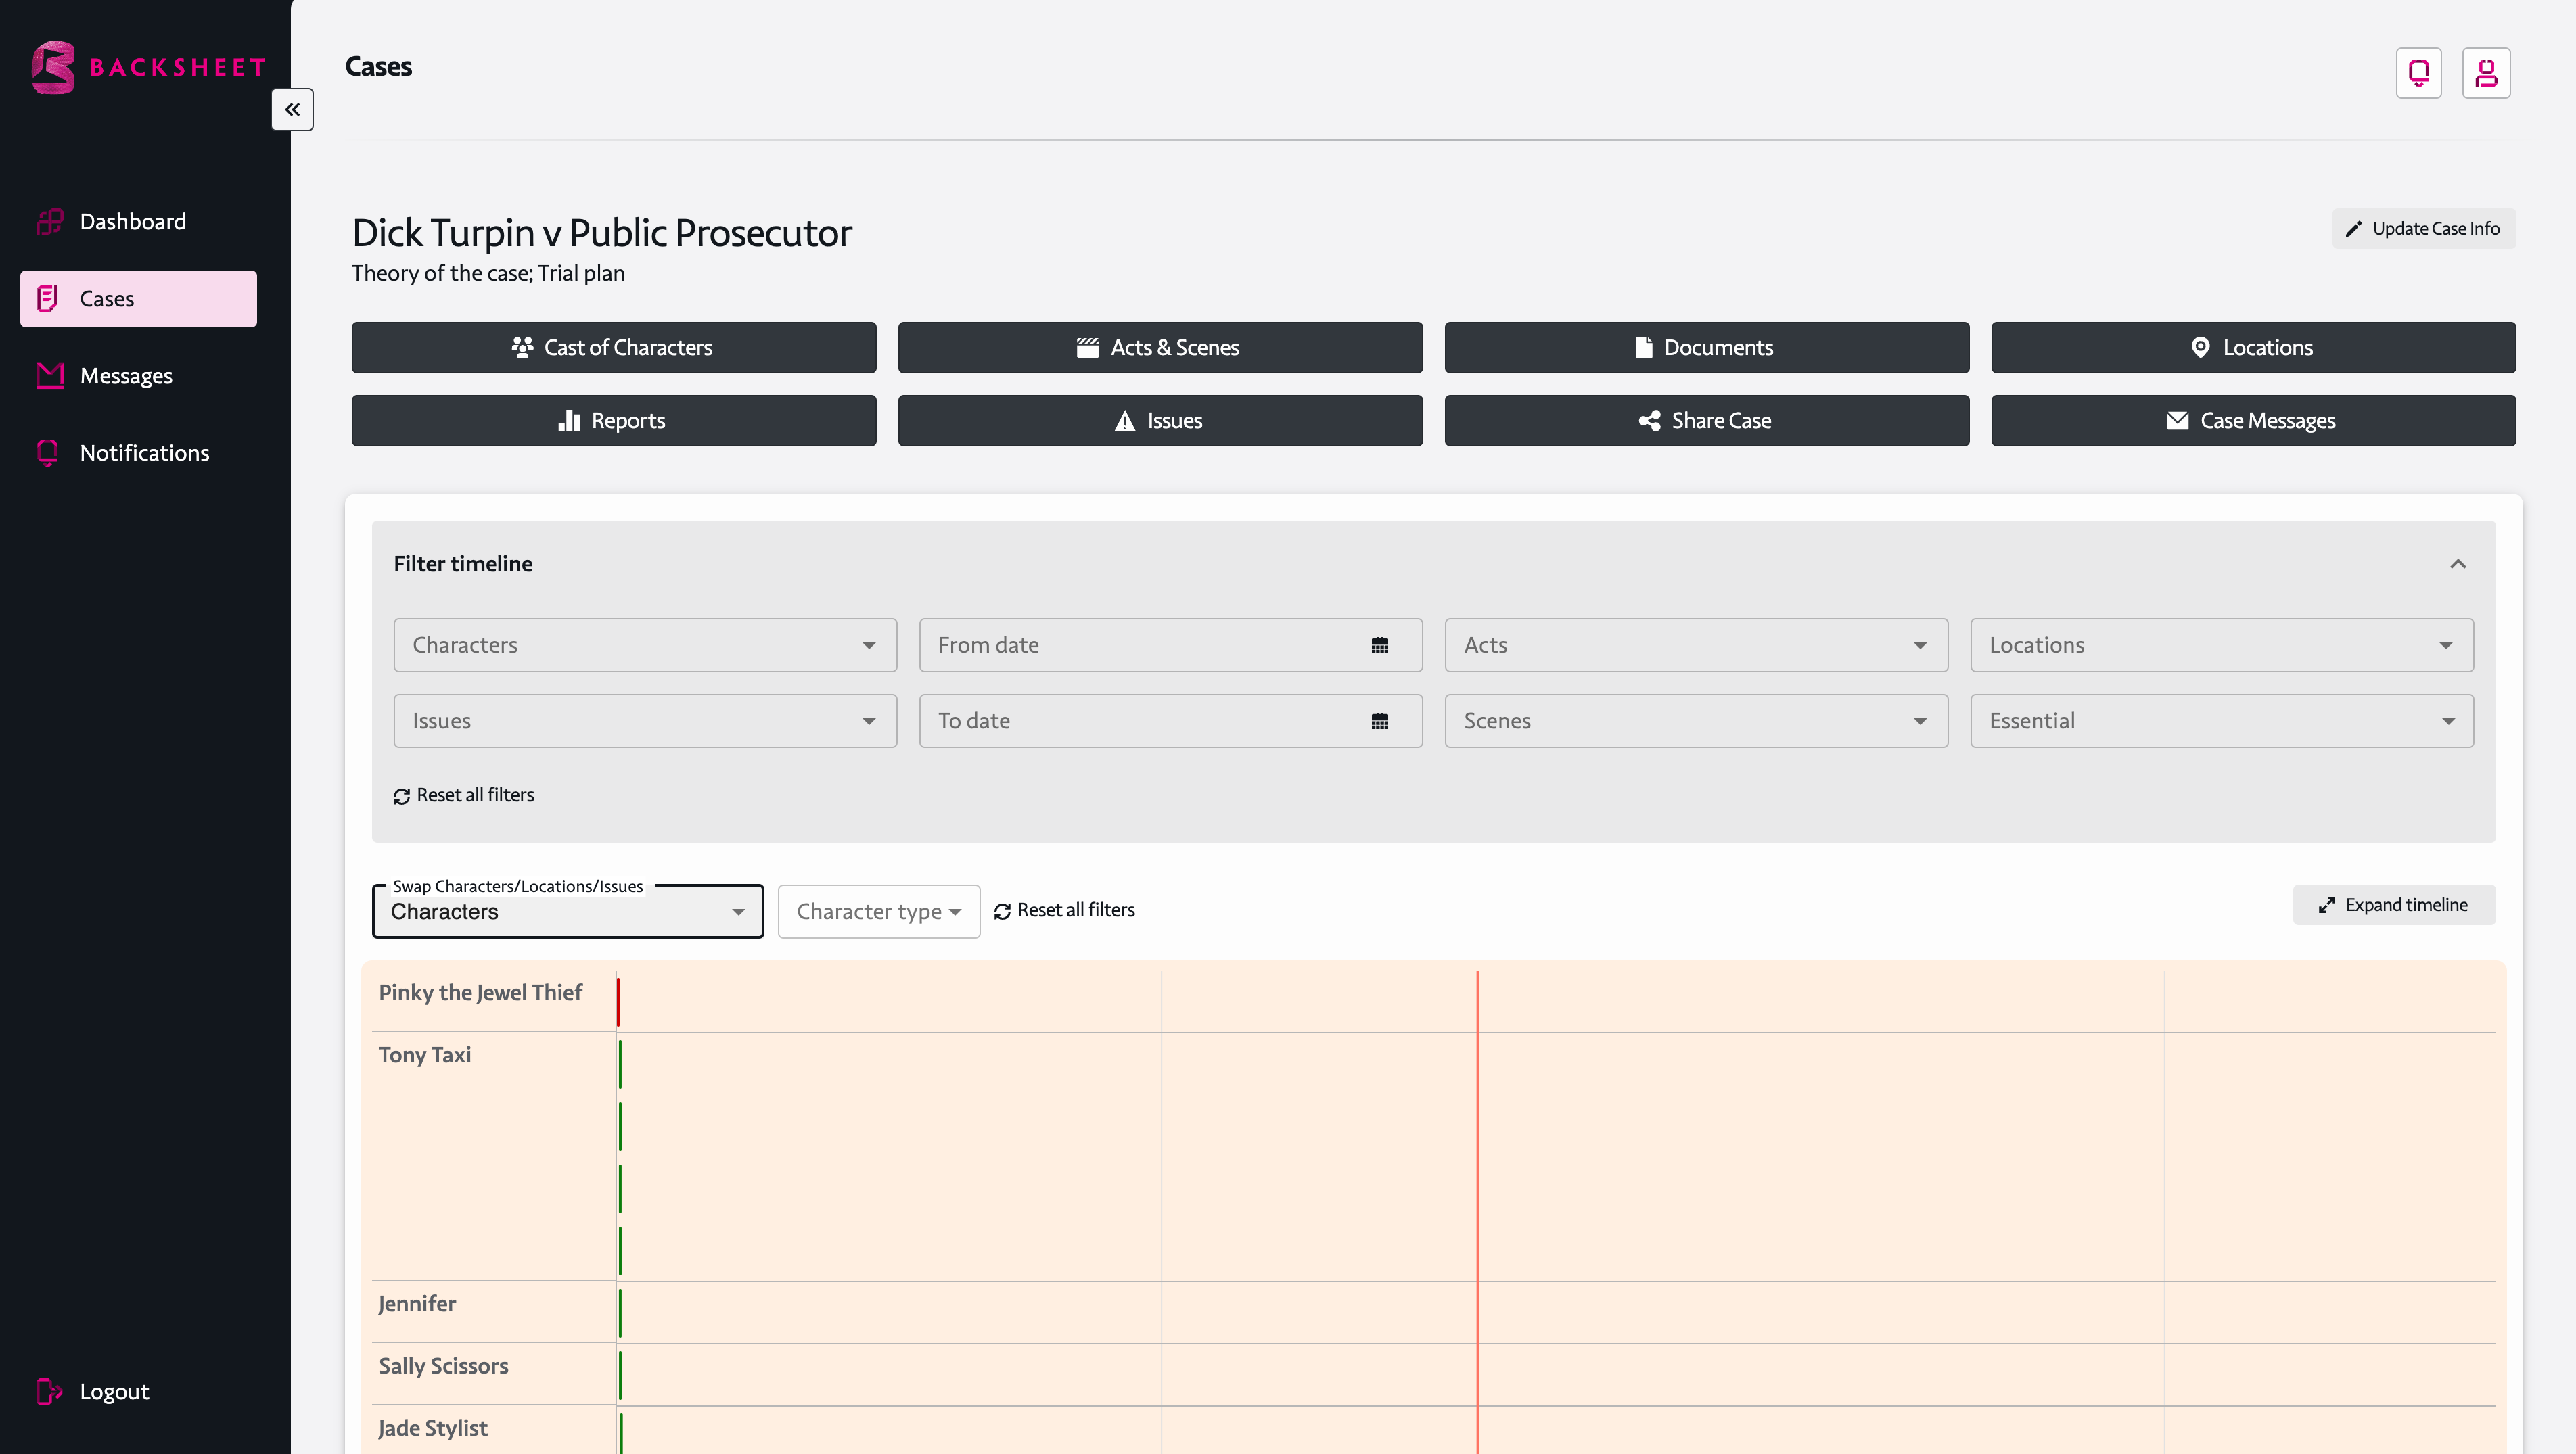
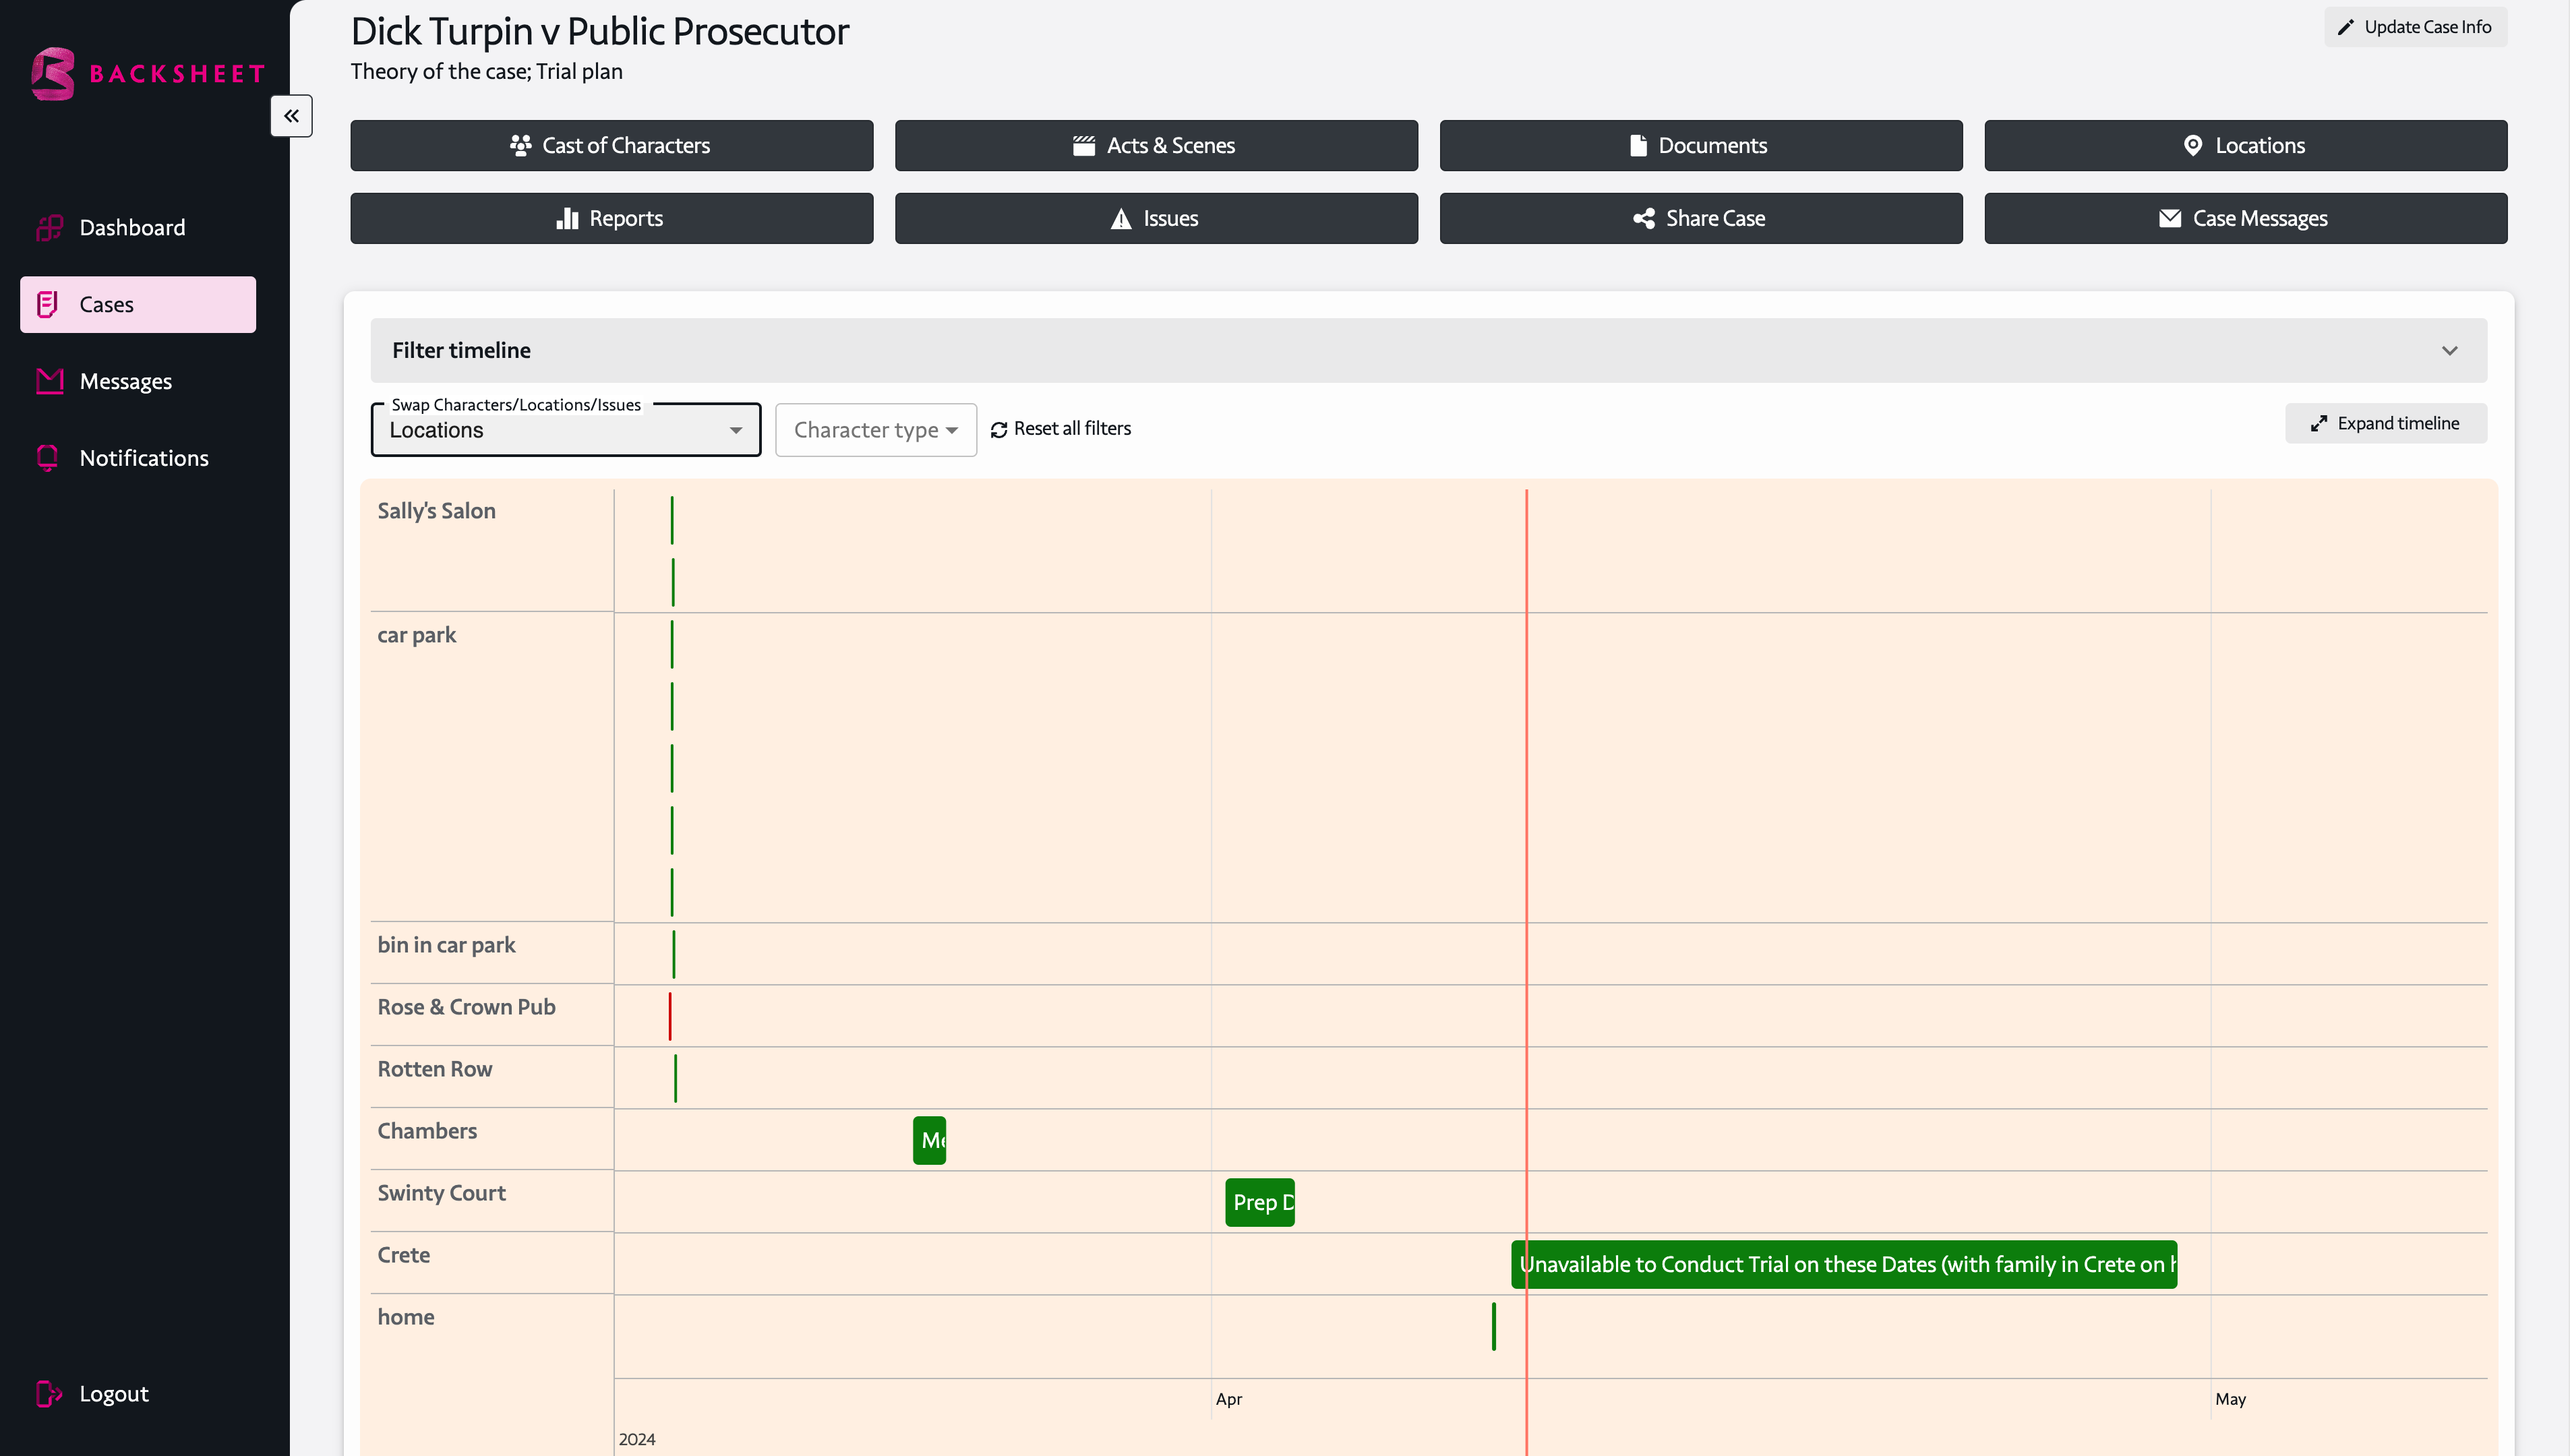
What you will also see below the banner is the means for the user to populate a case with its component parts using – ‘Cast of characters’; ‘Acts & Scenes’; ‘Documents’; ‘Locations’; ‘Reports’; ‘Issues’; ‘Share Case’; ‘Case Management’, this allows the user to navigate the case by building the components of the case.
The ‘building blocks’ of the case are the ‘tabs’ – ‘Cast of characters’; ‘Acts & Scenes’; ‘Documents’; ‘Locations’; ‘Reports’; ‘Issues’; ‘Share Case’; ‘Case Management’. These are the building blocks for the timeline of the case.
The filters in the boxes below the building blocks (‘Cast of characters’; ‘Acts & Scenes’; ‘Documents’; ‘Locations’; ‘Reports’; ‘Issues’; ‘Share Case’; ‘Case Management’ ) which are ‘characters’; ‘from date’; ‘Acts’; ‘Locations’; ‘Issues’; ‘To Date’; ‘Scenes’; ‘Essential Facts’ are filters to let the user see what is available to them from the ‘building blocks’ on the time-line.
Underneath that, there is a further filter on the timeline allowing the user to swap characters/ Locations/ Issues and to combine that with ‘filtering’ the character type (Leading character etc.).
Now you are orientated, choose whether to add a character or add a document (foundational to the action or case) you are creating.
Add a Character – how do I do it?
There are eight ‘building block’ tabs for the app – ‘Cast of characters’; ‘Acts & Scenes’; ‘Documents’; ‘Locations’; ‘Reports’; ‘Issues’; ‘Share Case’; ‘Case Messages’ – choose ‘Cast of Characters’ and click.
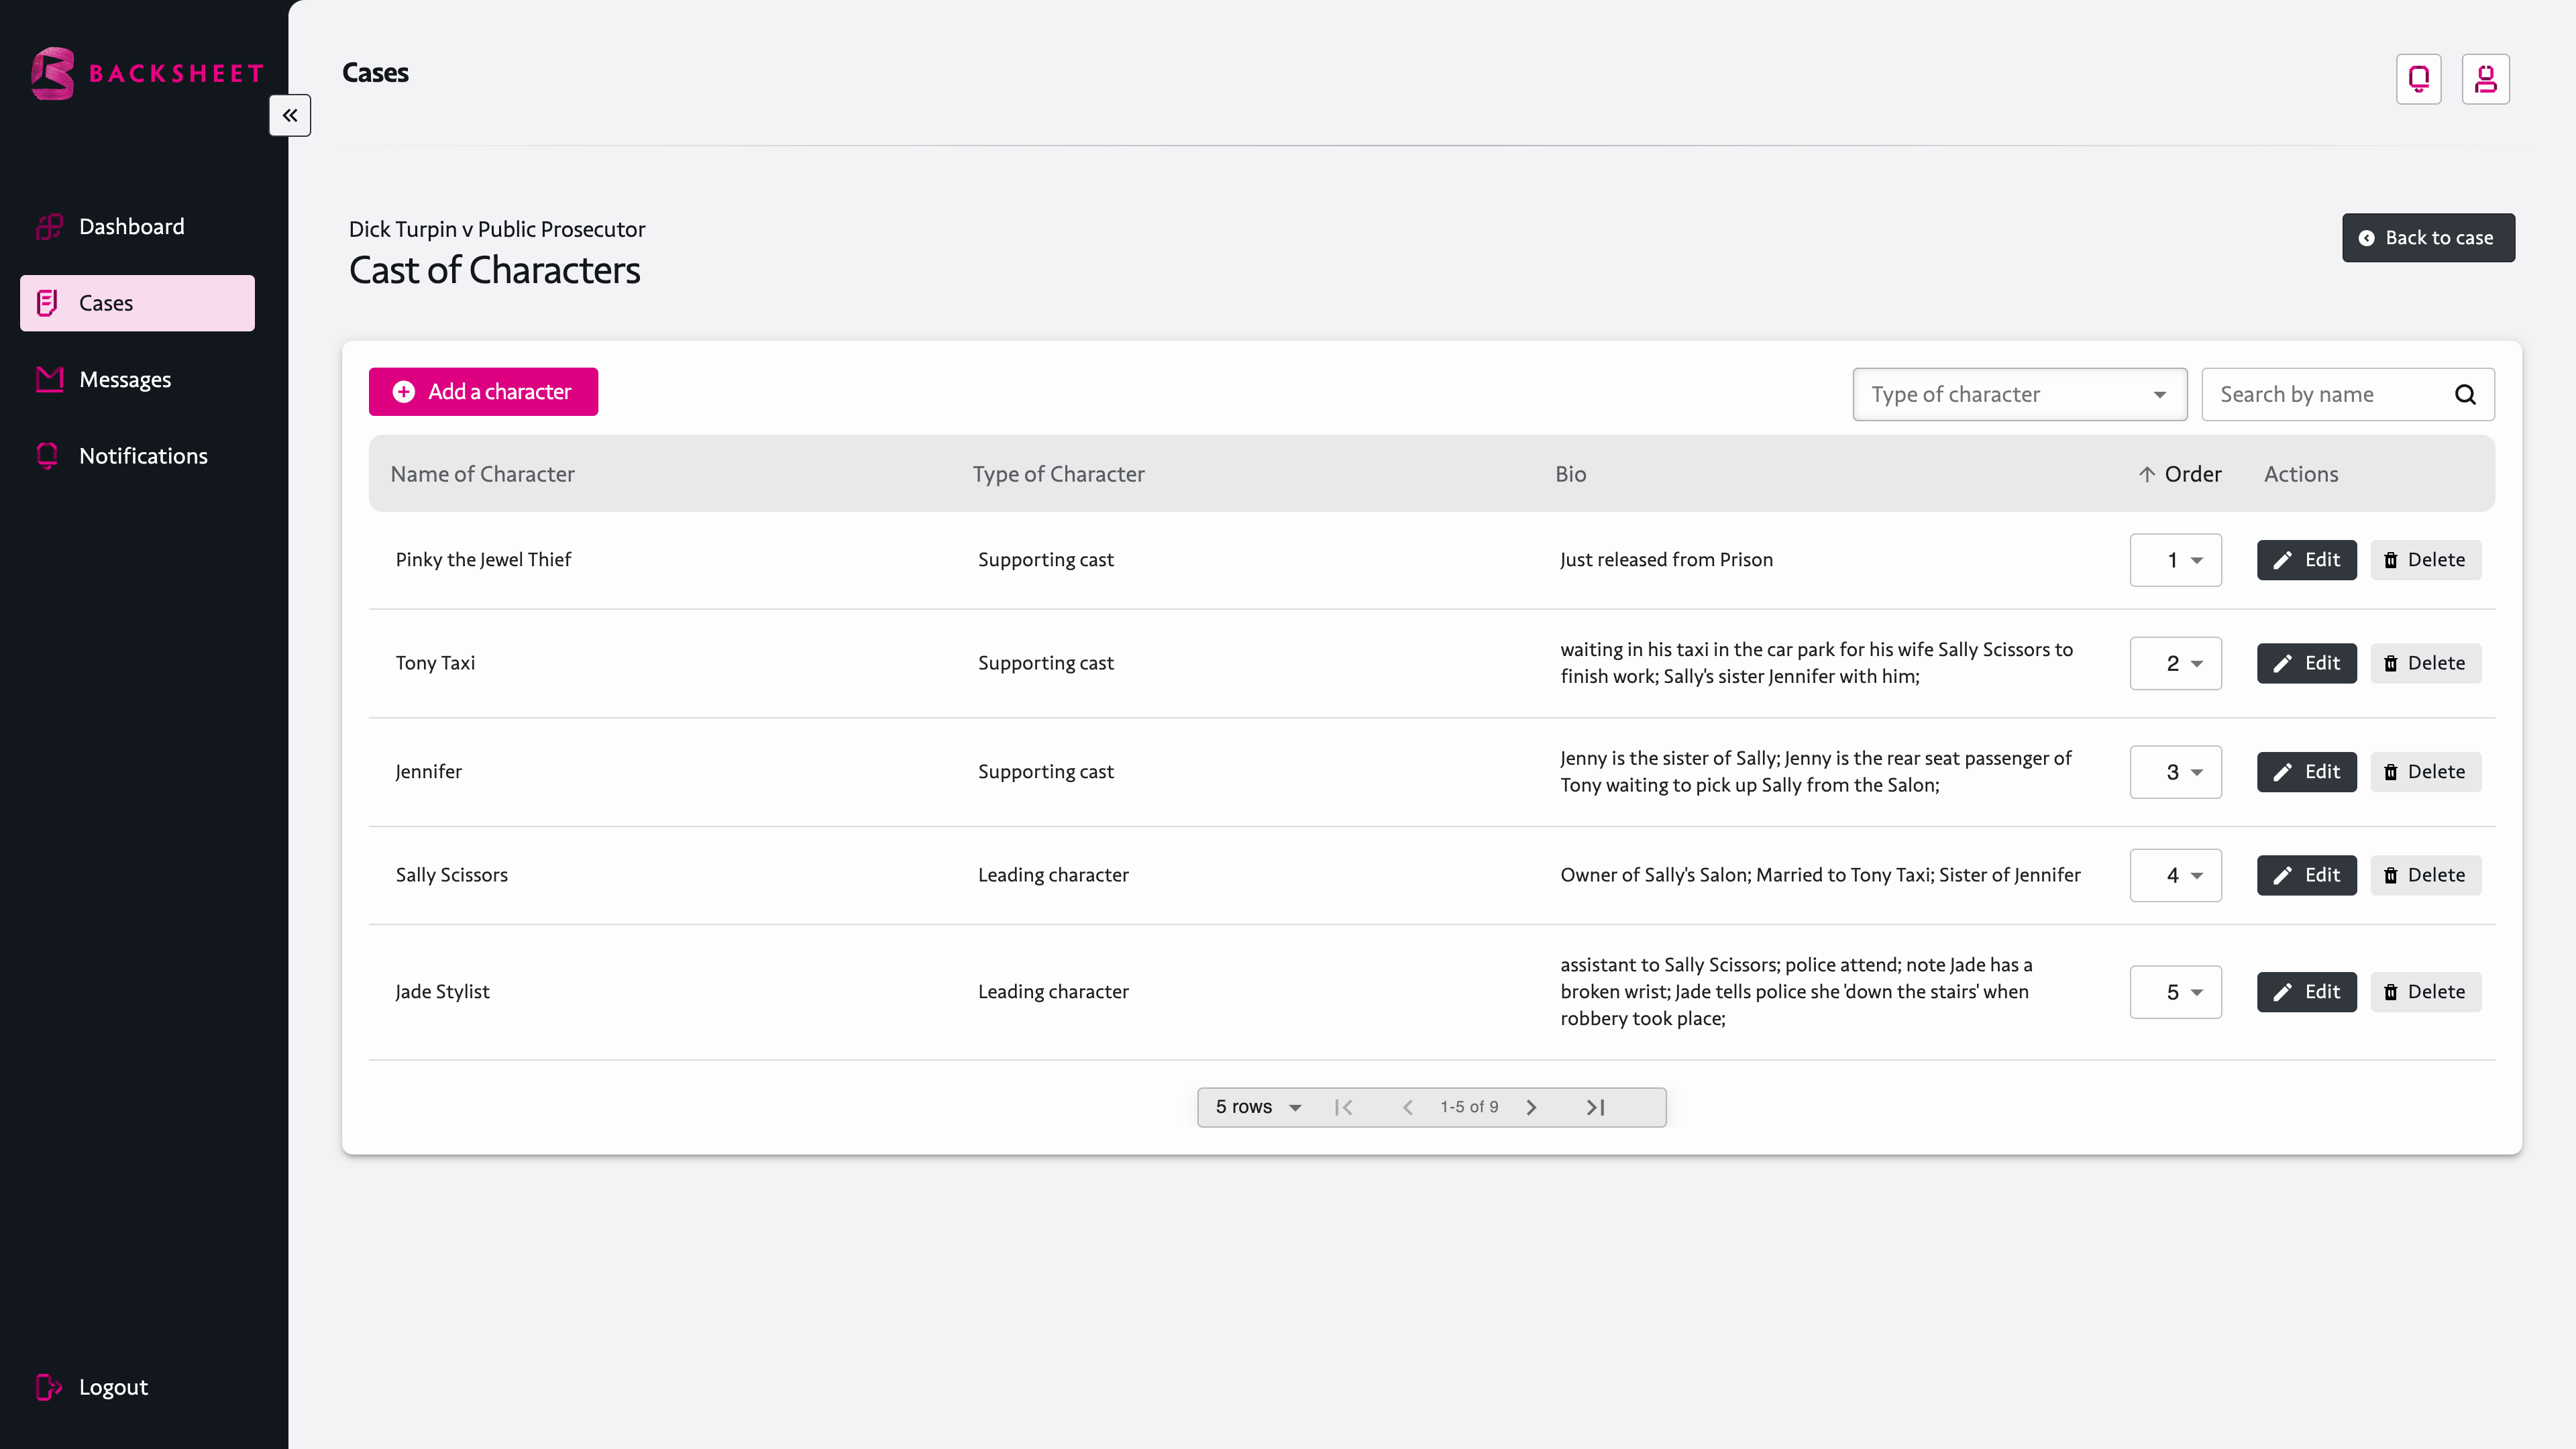
You will come to a new page which has the name of the case at the top, the description, ‘Cast of Characters’ and a bright pink button “+Add a Character” – you will see that once added it will show the name of the character, the type of the character a Bio and the witness can be ordered by number.
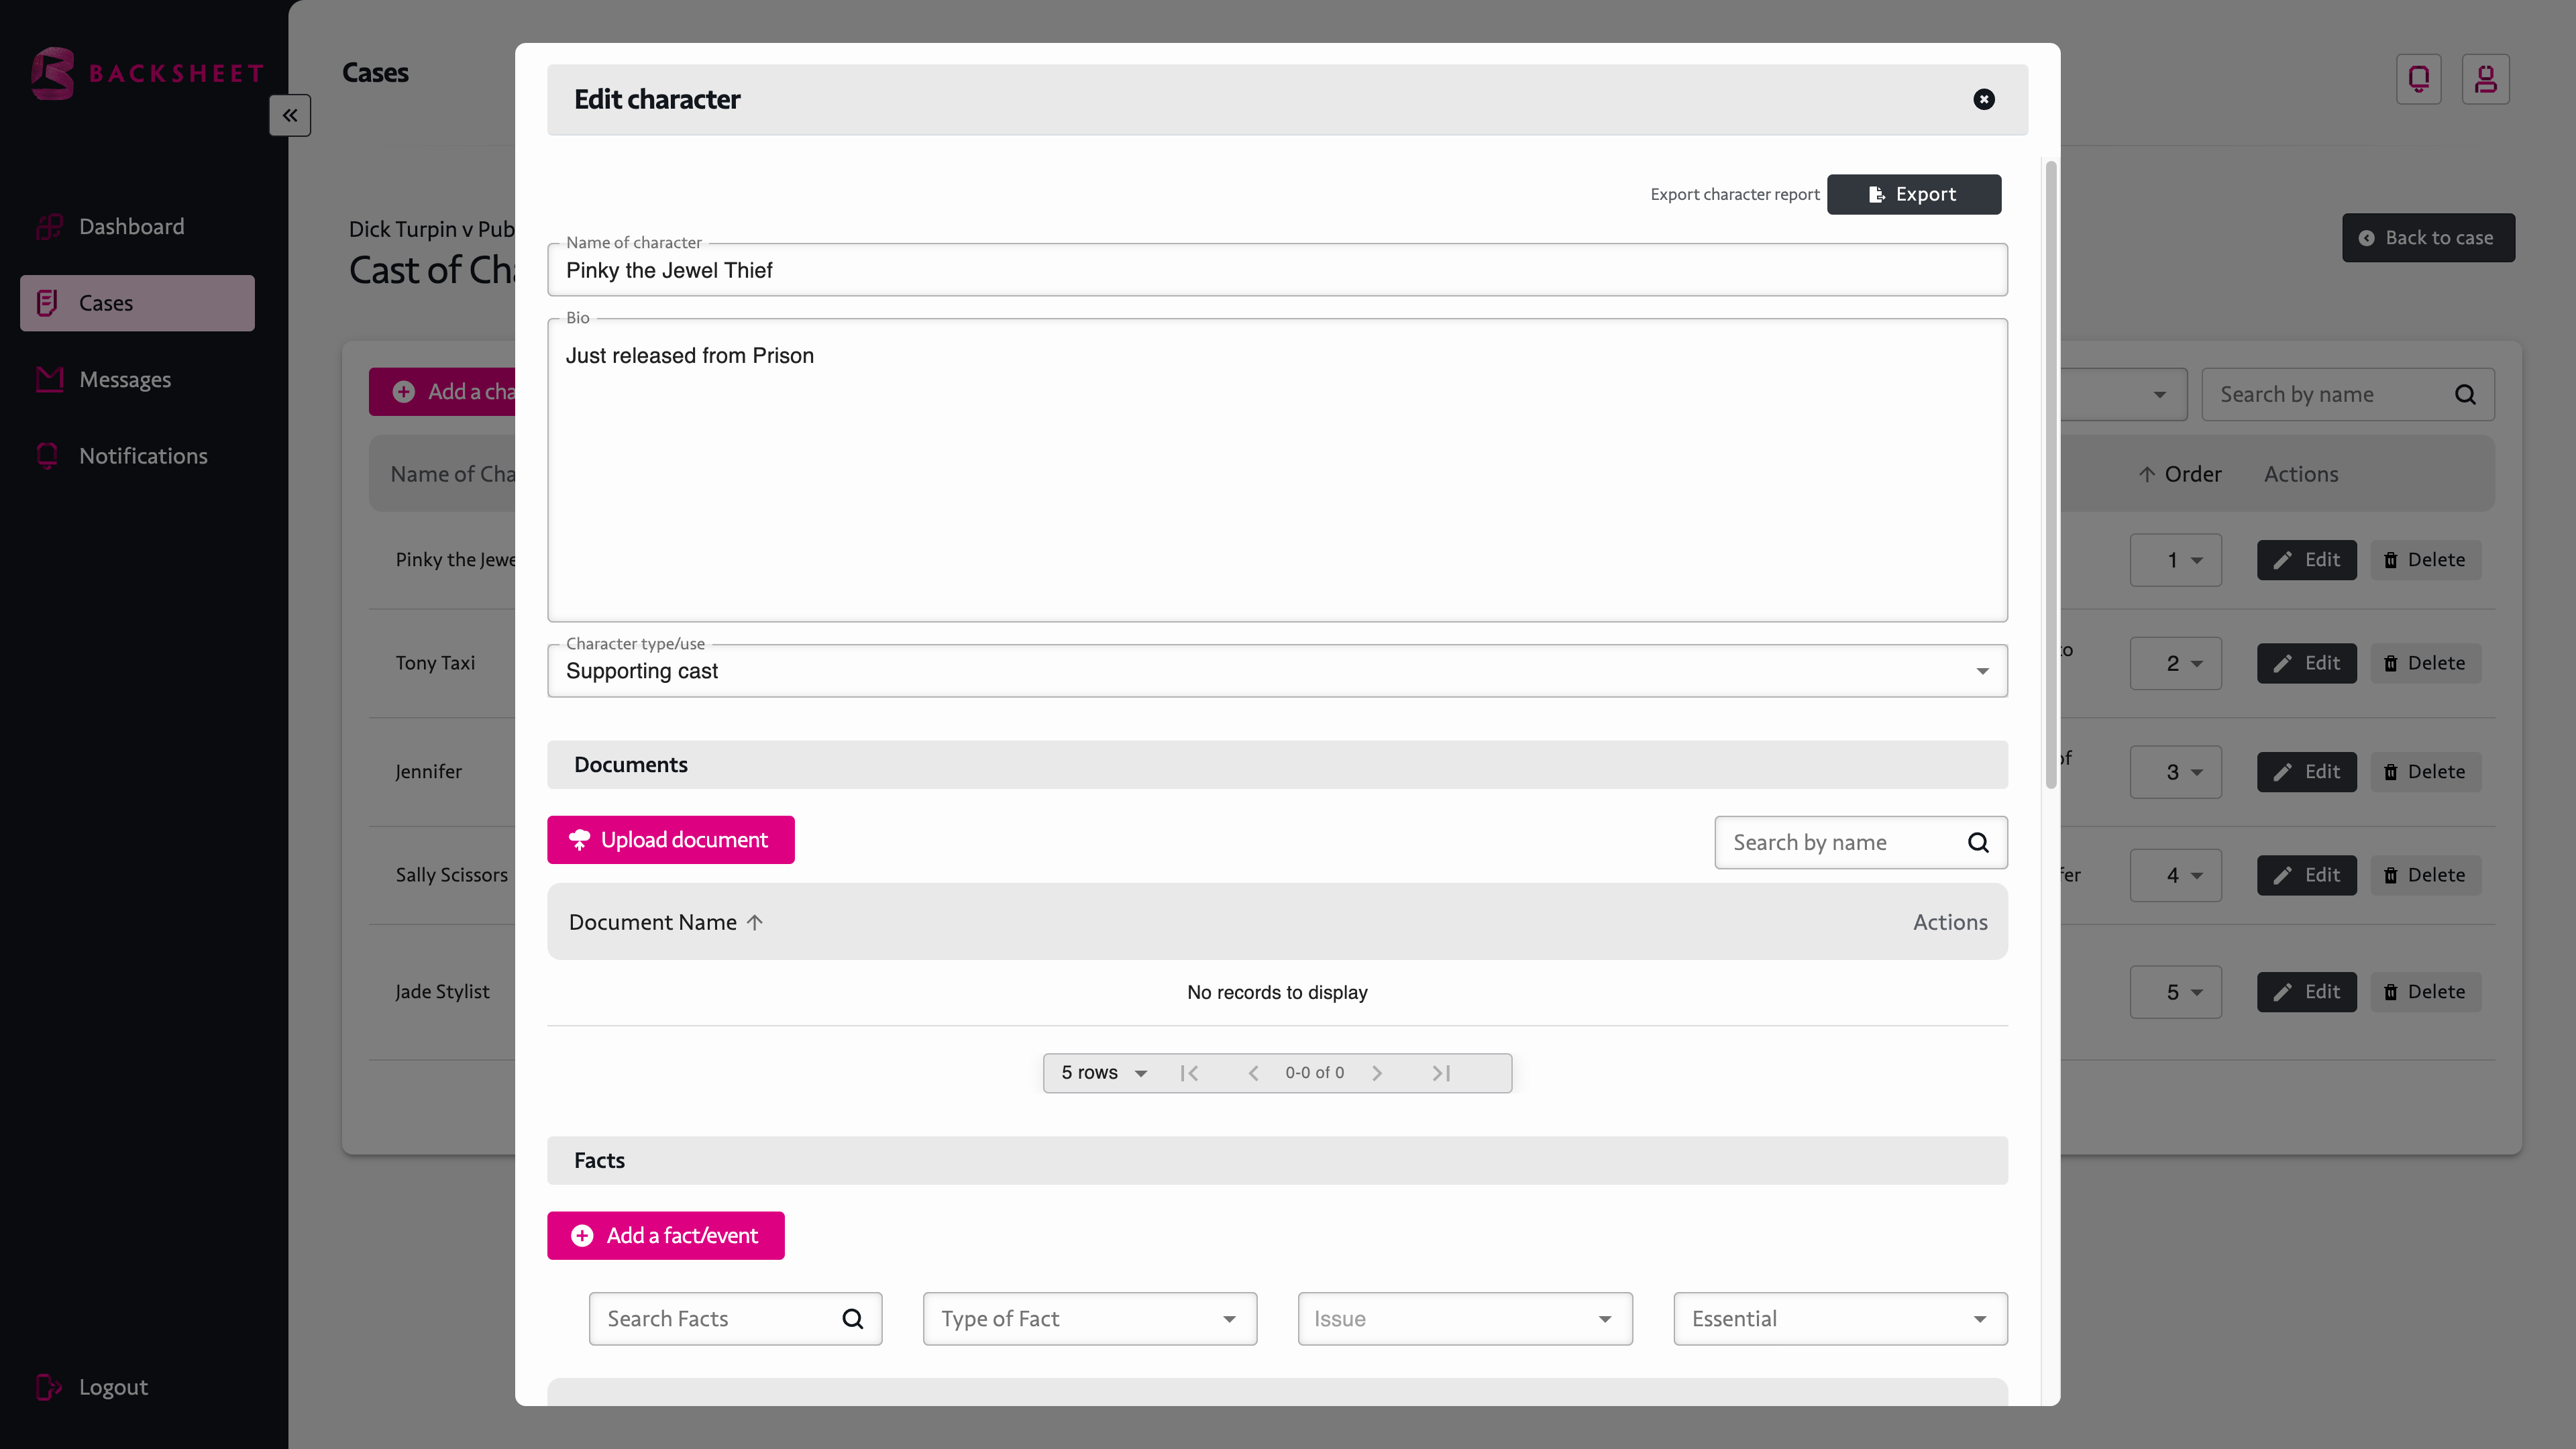
Click “+Add a Character” and a box appears asking for the ‘Name of the Character’ the ‘Bio’ and the character type/ use.
If the character is put in as an ‘extra’ it can be assigned a date and time but, it will not appear on the timeline. Any other character type will appear on the timeline.
Give the character a name & any biography that may help, then designate whether or not it is a leading character and press ‘save’.
When you save the character, this will automatically open a new box.
This new box has optional fields – these fields are ‘add a document’ (for example a witness statement, an expert report etc.) so you can upload a document to the app; add a fact/ event; add question(s); add a note(s).
You can add any number of facts or questions or notes.
The timeline is for the chapters of evidence which the characters (witnesses) speak to.
You can double click on the chapter of evidence in the timeline which will take you to the evidence of the witness.
Press update for the fact and press update before leaving the page. Press ‘return to case’ at the top right of the page, this will take you to the part of the timeline which has the event (the chapter of evidence you have just added).
To edit – go to the timeline and double click on the ‘fact’ or ‘chapter of evidence’. You will be taken to the window to edit.
Once you have added a few characters, you can go to the building blocks and you have an option to choose where the character appears on the timeline, just choose a number next to the character (the highest number is at the top of the axis).
Rather than beginning a case by adding a character to the app you could instead add a document – for example the foundational document of the action (the statement of claim or the criminal complaint or the document setting out the facts in a mediation) or you can start by creating a character.
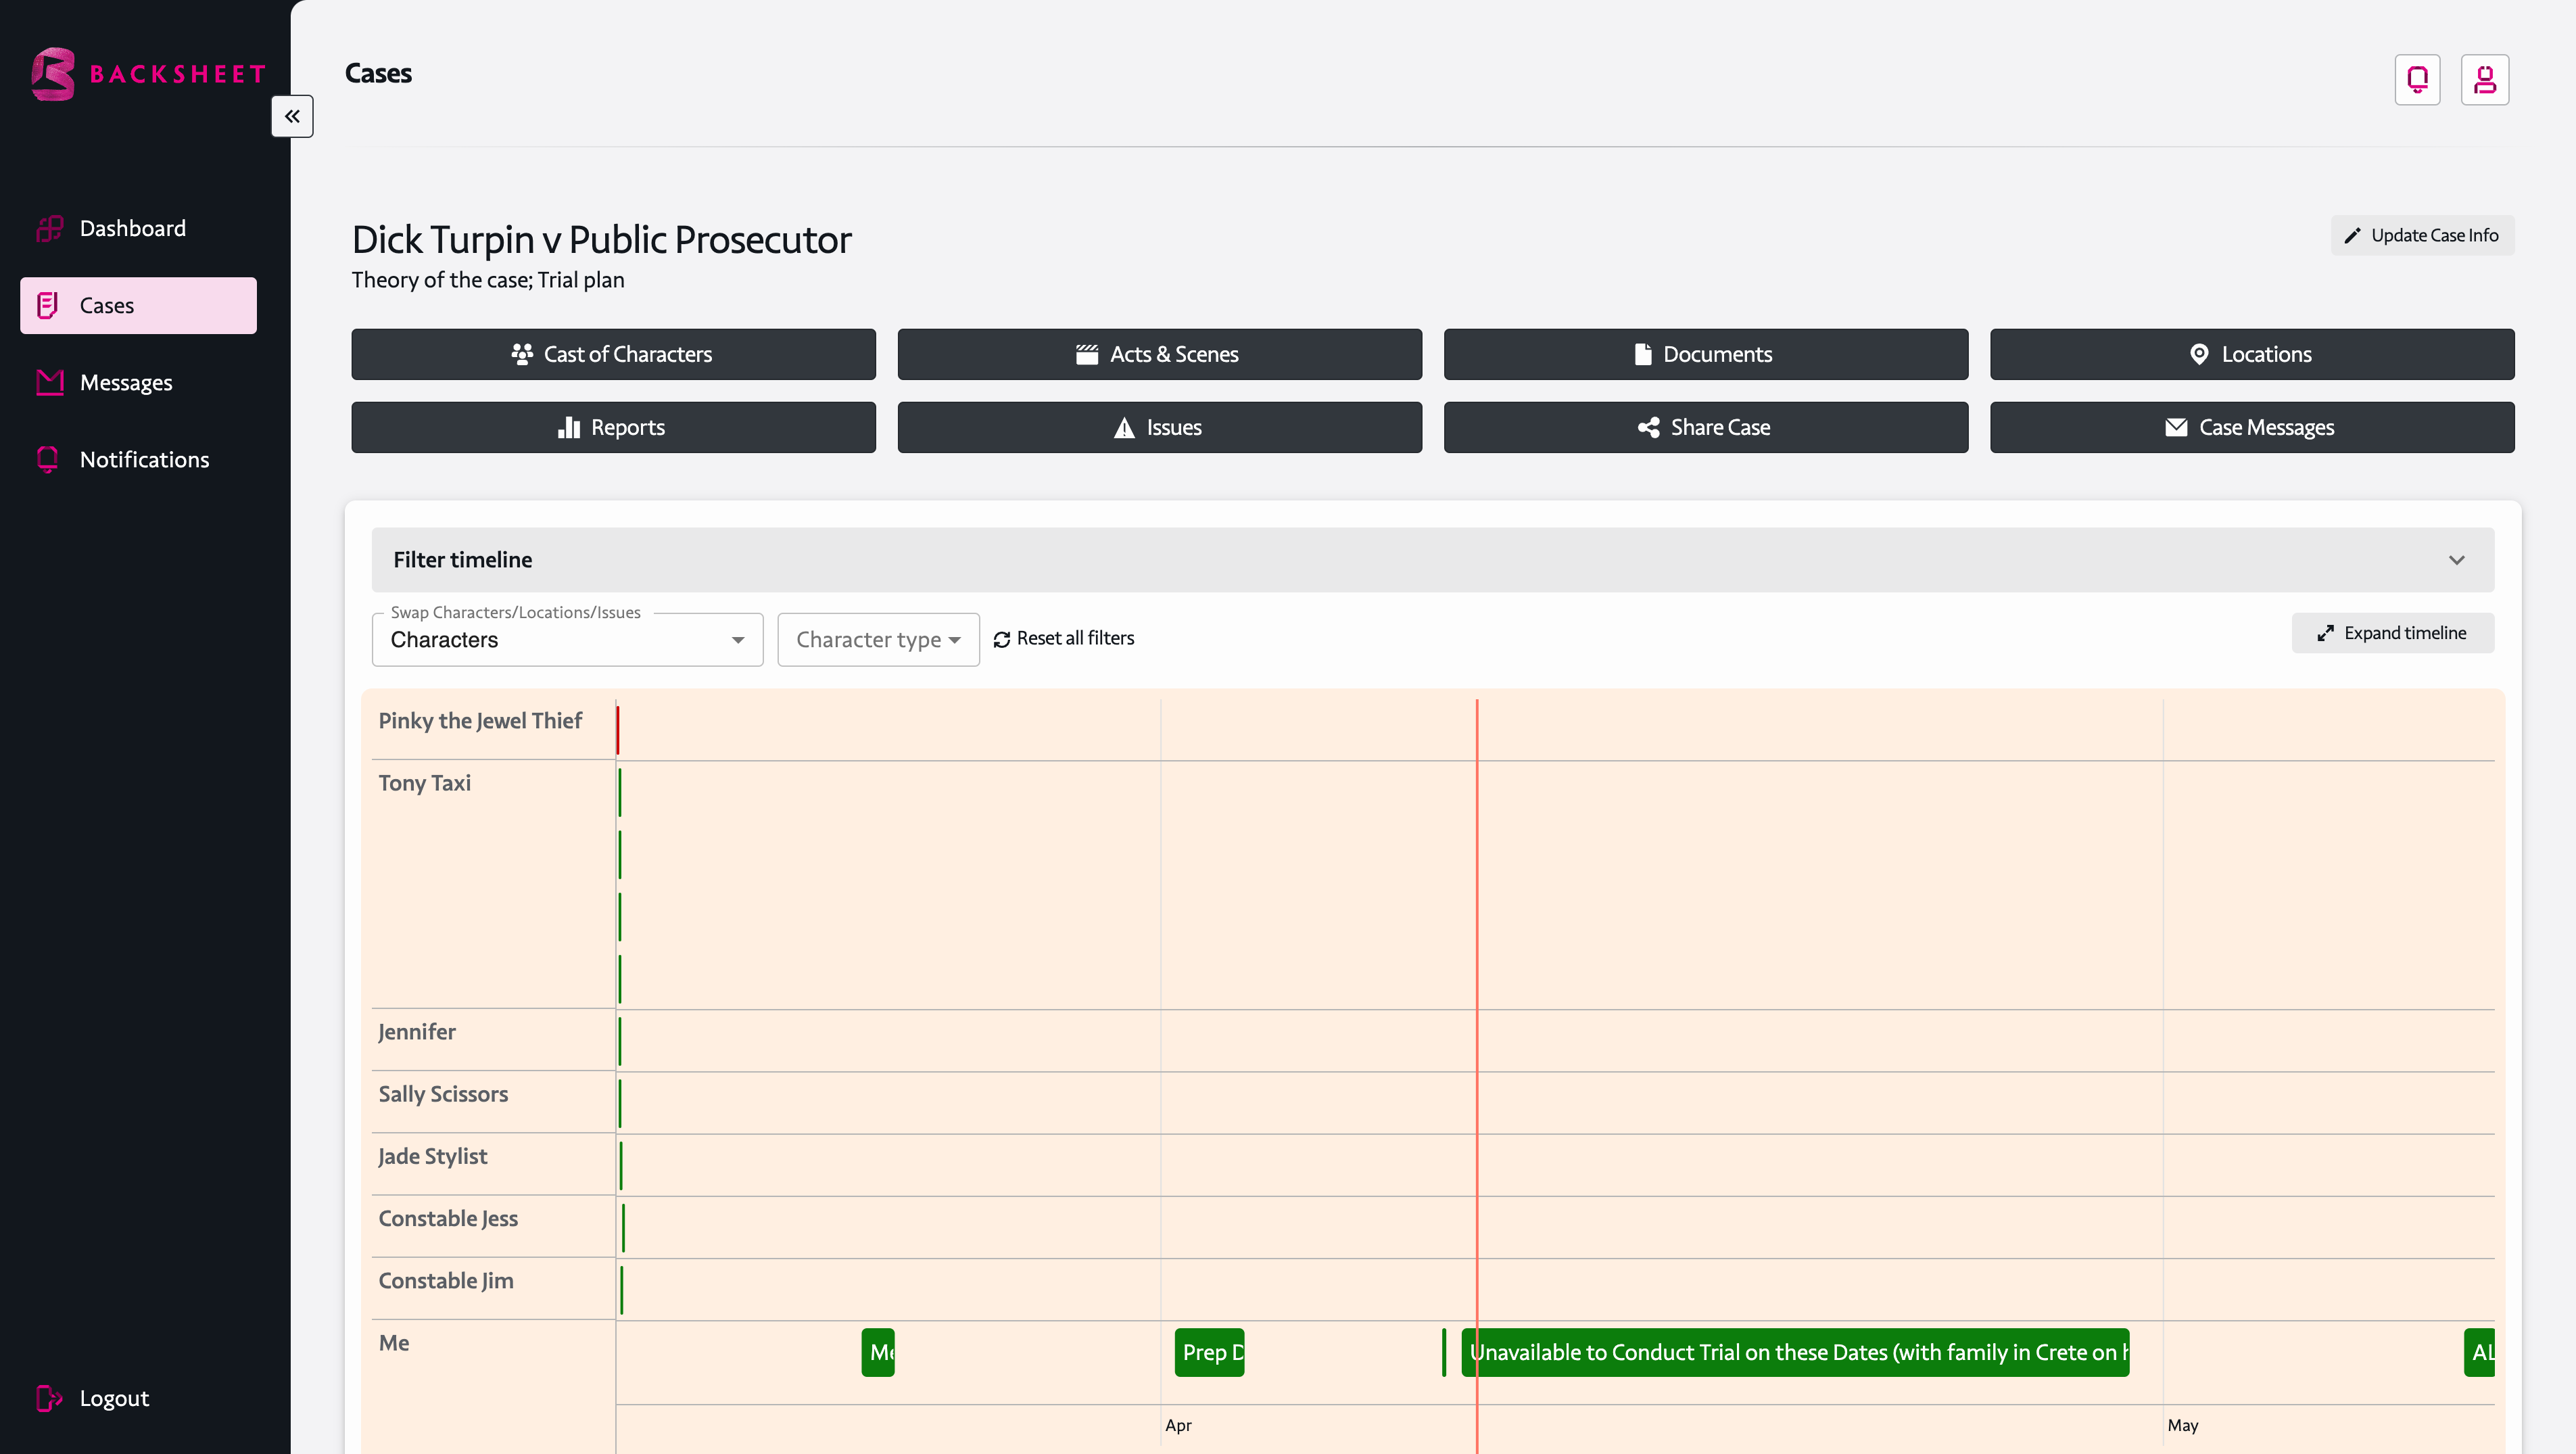
The timeline places characters on the y-axis and the date & time on the x-axis.
You can arrange the order of characters on the y-axis by editing ‘cast of characters’ where you will see a number beside the character – choose a number to decide where on the timeline the character is stacked on the y-axis.
If you do not choose the order for the character to appear, the order the character is created in will decide where it is on the y-axis (but as mentioned, you can choose where it will feature on the axis).
The timeline is divided by minute, hour, day, month and year going through the decades – there is a vertical red line running up the timeline.
The red line represents the present time to the second.
If you use two fingers on your trackpad to zoom out of the timeline, you can watch the red line progress through the seconds of the minutes of the hours of the day of the month of the year you are in!
You can book end a period in the timeline either by going to the filters and choosing a ‘from’ date and time and a ‘to’ date and time – all of the action in that time frame will be appear as a snapshot, it can further be filtered by character, issue or location.
The ‘Acts & Scenes’ filter achieves the same thing – Acts & Scenes will bookend a time period.
In BACKSHEET Facts and Events are dealt with differently – in BACKSHEET you can carry out a good fact/ bad fact analysis for each character.
This is done by doing the following.
Should you not wish to carry out a good fact/ bad fact analysis you may wish to get the evidence a character is anticipated to give to the court from their witness statement into BACKSHEET – one way to do that is to divide the evidence a witness will give into ‘chapters’ of evidence and that can be done by designating a chapter of evidence, which will appear on the time-line.
That lets the user think through how to frame questions for a witness chapter by chapter with the evidence being put into the ‘evidence’ section for the character, divided into the chapters on the timeline.
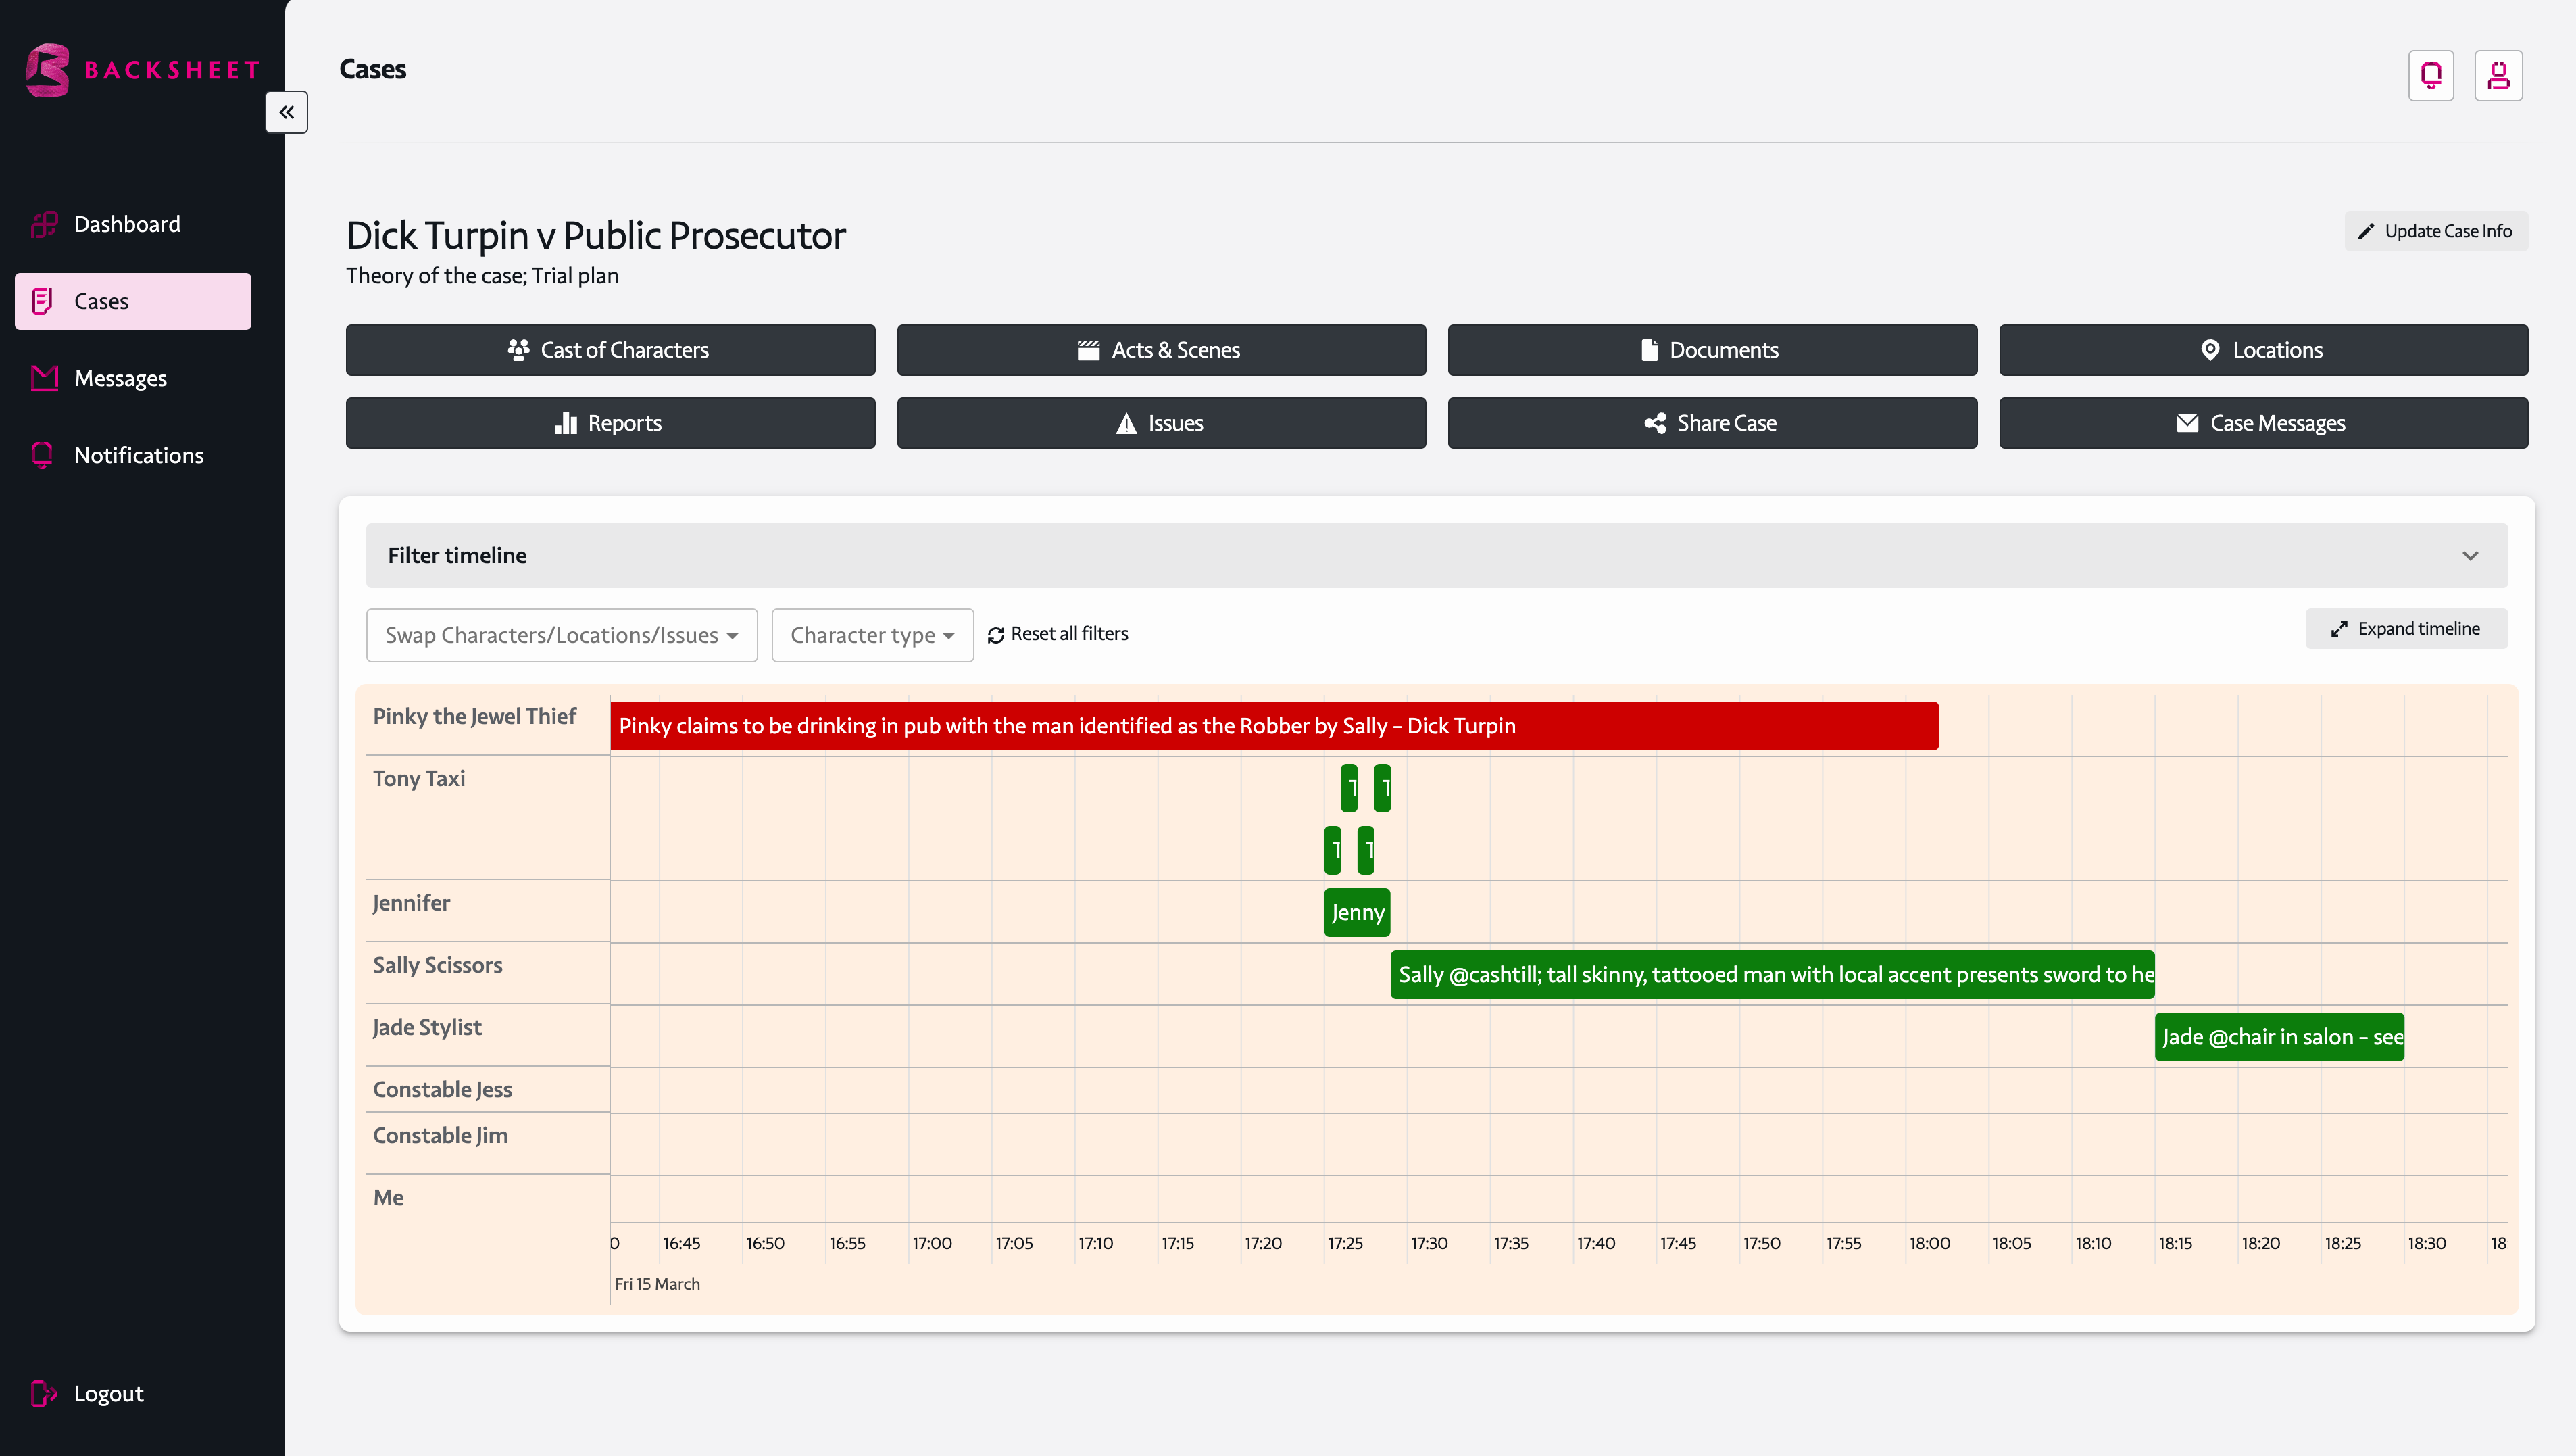
Alternatively, each fact can be put on the timeline as individual facts because the timeline breaks down not only into years, months, days and hours, but also into minutes.
So, facts can be input in chronological sequence on a minute-by-minute basis on the timeline.
The Facts section has the following – ‘+Add a fact/ event’; under the ‘+Add a fact/ event’ button are a series of boxes, ‘Search Facts’ / ‘Type of Fact’ / ‘Issue’ / Critical.
The first box is a facility to search through the facts.
The remaining boxes are filters to re-arrange the facts according to the ‘filter’, so under ‘Type of Fact’ the filter allows the user to see all of the ‘good facts’ or ‘bad facts’ and ‘issues’ pops up all of the issues anchored to the character.
The user can filter by ‘issue’.
Moving on to add an Event.
Events are an alternative way populate the timeline from a minute-by-minute approach.
The minute-by-minute approach is where the facts are listed in the timeline as they occur and the aggregate of those facts comprise a chapter of evidence.
The ‘event’ approach is to choose a title for that group of facts and enter the title of the grouping of facts (i.e. a ‘chapter’ heading) and put that chapter heading over the period of time which the minute-by-minute event occurs.
The difference is that when the ‘event’ method is used, a chapter heading appears on the timeline for the relevant period and the individual facts are listed in the character’s ‘evidence’ box; the minute-by-minute approach would not have the facts listed in the character’s evidence box as they are listed / appear on the timeline.
Express another way: Add to the time-line the chapter heading and under that in ‘Legal Points / Objections / Submissions’ you can put in there any point about the evidence; in the ‘Evidence’ section you can copy and paste the witness statement and divide it into chapters of evidence, then put the event on the time-line by giving it a date and time and decide whether the event is a good fact or bad fact and whether it is critical to the issue in dispute.
Press ‘save’ to update the event to the time-line (remember if you choose the character type of ‘extra’ even though you put a date and time on the fact/ event for the character, an extra will not appear on the time-line!).
You can edit the character and the ‘fact’ or ‘event’ by double clicking on the name of the character/ location/ issue on the y-axis and you can edit the chapter of evidence (the Fact/ Event).
You can edit the individual fact/ event by double clicking the time-line fact/ event; you can also add to the character or chapter of evidence new questions or notes.
How do I carry out a Good Fact Bad Fact Analysis (for the evidence of a Character)
Create a Character – what you want to do is create a list of all the facts the witness speaks to and put each fact into one of two categories, either it is a good fact or a bad fact for the case you are prosecuting on behalf of your client, which will guide you through the likelihood of succeeding to prove the issues in dispute.
To carry out a Good Fact Bad Fact Analysis for the evidence of a Character do the following:
Go into Character (the second fact to be added in the Good Fact / Bad Fact Analysis will be in ‘Edit Character’) and click the ‘+Add a fact/event’ – a new window will open titled ‘Add fact’.
Note that a Good Fact / Bad Fact analysis does not put the facts or events on the time-line: the Good Fact / Bad Fact analysis is used to work out the facts, which can be used to prove an issue in the case. a Good Fact / Bad Fact analysis is carried out in the earliest preparatory stage of the case to work out whether to proceed to proof or negotiate towards a negotiated outcome rather than an adjudicated outcome.
A Good Fact / Bad Fact analysis in the app is done by being in the character window, clicking on the ‘+Add a fact/event’ which brings up a new window titled ‘Add fact’ – in that window the user need only complete the following boxes.
Click ‘Add a fact/event’ which opens up a new window then add a fact decide whether it is a good fact or bad fact and press update and that will add the fact to the facts section of the character – but note, there is no date and time attributed for a ‘Good Fact / Bad Fact Analysis’ so the fact will not be on the time-line as there is no date or time to ‘get it onto the time-line’.
Note – do not populate the following boxes: ‘Legal Points / Objections / Submissions’ nor the ‘Evidence’ nor ‘Date and Time’ nor ‘Critical Fact’ (again, these boxes are not to be completed – the only boxes to be populated are ‘Title’ & ‘Fact Type (Fact Type is either a Good Fact or Bad Fact and this box must be completed).
After you have named a case and given it a description the case will appear on the ‘Cases’ window – that is where all of your cases are accessed from. To go to the case to build a case click on ‘View Case’ at far right of ‘cases’ window under the ‘Actions’ column. After you click ‘view case’ you are taken to that case – you will see the time-line and you will see the red vertical line on the time line which when there are no characters on the time-line will show the time at present (and the day and date) and, if you zoom into the time-line (use two fingers on your trackpad to do so) you will be able to see the time to the second!
Click on ‘View Case’ then ‘Cast of Characters’ then click ‘+Add a character’ then populate the pop-up fields in the new window which are ‘Name of Character’; ‘Bio’ & ‘Character Type’ and press save.
Once you save the Name of Character’; ‘Bio’ & ‘Character Type’ this window expands to fill out the character’s details – these are ‘Documents’ (Upload a Document); Facts (Add a Fact or Event to the Character); Notes (Add a Note(s) to the Character); and then an Update button to save all of the new information has been added.
When you see the case you should click ‘Expand Timeline’ to see more of the time-line where you will now be working; to filter the views on the time-line click the dropdown arrow on the banner above ‘collapse time-line’ to show the time-line filters (these are on the top line four filters – ‘characters’; ‘from date’; ‘Acts’; ‘Locations’; and on the line below another four filters – ‘Issues’; ‘To Date’; ‘Scenes’; ‘Essential Facts’).
These are filters to let the user navigate the time-line – if at any time you want to leave the case go to the side-bar and click ‘cases’ which will take you back to the first window for ‘cases’ where all of the cases are located.
If you do that and return to an individual case you have created you will see a view with the eight case ‘building block’ tabs at the top of the page coloured in black (these are – ‘Cast of characters’; ‘Acts & Scenes’; ‘Documents’; ‘Locations’; ‘Reports’; ‘Issues’; ‘Share Case’; ‘Case Management’, these allow the user to navigate the building the components of the case).
You will also see directly underneath the ‘building block’ tabs a banner with ‘Filter Timeline’ written on the left side of the banner and a downwards facing arrow on the right side of the banner opposite ‘Filter Timeline’.
Below the arrow on the ‘Filter Timeline’ banner is another banner with the following clear boxes: ‘swap characters/ locations/ issues’ and ‘Character type’ then at the far end of the banner a box ‘Expand timeline’ re is then the ‘building blocks’ tab disappears from view and the you will see the ‘Filter timeline’ banner with the down arrow at the far right of the banner and timeline.
If you wish to filter the timeline either press the down arrow on the ‘filter timeline’ banner at the far right to access the following filters;- ‘characters’; ‘from date’; ‘Acts’; ‘Locations’; ‘Issues’; ‘To Date’; ‘Scenes’; ‘Essential Facts.
To filter quickly use the toggle button on the timeline – ‘swap characters/ Locations/ Issues’ and you can combine that with the toggle ‘character type’ (Leading character etc.) button.
You can reset all filters by using the ‘Reset all Filters’ button next to ‘character type’.
You will notice if you open the ‘Filter timeline’ using the down arrow then once the ‘Filter timeline’ is opened the arrow button on the ‘Filter timeline’ turns upwards – press again to you hide the ‘Filter timeline’.
You can access the ‘building block’ tabs by pressing ‘collapse timeline’ which is at the far right from ‘swap characters/ Locations/ Issues’ and is directly underneath the down arrow on the ‘Filter timeline’ banner.
So, to show the whole screen (the whole screen is from the top – the name and description of the case; the (black background coloured) ‘building block’ tabs; the (the grey coloured) ‘Filter timeline’ (banner) and then underneath the ‘timeline’ view – using the ‘expand timeline’ button (opposite ‘swap characters/ Locations/ Issues’) then press the up arrow on the ‘Filter timeline’ banner and that will show the timeline (the ‘building blocks’ tabs are hidden, the ‘Filter timeline’ banner is shown but, the filters (‘characters’; ‘from date’; ‘Acts’; ‘Locations’; ‘Issues’; ‘To Date’; ‘Scenes’; ‘Essential Facts) are hidden unless you press the down arrow on the ‘Filter timeline’ banner which if pressed will show the timeline. Again – if you want to access the ‘building block’ tabs then press ‘collapse timeline’ button opposite ‘swap characters/ Locations/ Issues’ and ‘character type’ and ‘Reset filters’.
What you will also see below the banner is the means for the user to populate a case with its component parts using – ‘Cast of characters’; ‘Acts & Scenes’; ‘Documents’; ‘Locations’; ‘Reports’; ‘Issues’; ‘Share Case’; ‘Case Management’, this allows the user to navigate the case by building the components of the case.
The ‘building blocks’ of the case, the ‘tabs’ ‘Cast of characters’; ‘Acts & Scenes’; ‘Documents’; ‘Locations’; ‘Reports’; ‘Issues’; ‘Share Case’; ‘Case Management’ are the building blocks for the timeline of the case.
The filters in the boxes below the building blocks (‘Cast of characters’; ‘Acts & Scenes’; ‘Documents’; ‘Locations’; ‘Reports’; ‘Issues’; ‘Share Case’; ‘Case Management’ ) which are ‘characters’; ‘from date’; ‘Acts’; ‘Locations’; ‘Issues’; ‘To Date’; ‘Scenes’; ‘Essential Facts’ are filters to let the user see what is available to them from the ‘building blocks’ on the time-line.
Underneath that there is a further filter on the timeline allowing the user to swap characters/ Locations/ Issues and to combine that with character type (Leading character etc.).
A case comprises a narrative and issues for proof (supported by the narrative – or the evidence or the facts), which if proven, will allow a court or an arbitrator to grant a remedy sought. The first thing is to do a Good Fact Bad Fact analysis for the narrative – that is, for each witness by reference to their witness statement each fact which is spoken to by the witness should be divided into facts useful to prove an issue and facts which point away from proof of the issue.
How to carry out a Good Fact Bad Fact analysis is dealt with in another frequently asked question.
Next you will wish to take a witness statement and get the content of the witness into the BACKSHEET.
So the first thing is to create a character – go to the ‘cases’ window where you have an option to create a new case (the pink button at the top right ‘+Create a new case’) where you will be asked to give the new case a name and a description (the description may be your ‘theory of the case’ or the ‘issues’ for proof in the case or whatever you choose; that new case will now be added to the top of the list (shown in column form in the ‘cases’ window at the top of the list as the list is in chronological order – latest case shown top of the list).
You will then press ‘view case’ or ‘delete case’ – if you press ‘view case’ then you will be taken to the next window which has both the ‘building blocks’ tabs (eight tabs – these ‘tabs’ are ‘Cast of characters’; ‘Acts & Scenes’; ‘Documents’; ‘Locations’; ‘Reports’; ‘Issues’; ‘Share Case’; and the timeline.
As yet there is no information showing on the timeline – this is because as yet there are no facts or events added to the timeline.
Each fact or event is anchored to a character. A fact or event is always anchored to a Fact or Event (although if you choose a Fact or Event anchored to a character need not be on the timeline if you choose the character type to be an extra – but, you can promote the character to be a character type who does appear on the timeline i.e. a leading/ supporting or expert type character.
You now see the title of the case, the description of the case, four of the eight tabs for the building blocks and the date and time you are presently at with the timeline’s vertical ‘red line’ showing the time of the day you are working in.
The user builds a case using the ‘building blocks’ tabs – first thing to do, add a character.
Press the tab button designated ’Cast of Characters’ – that brings up a new window entitled ’Cast of Characters’ (in this window you can return to the case using the black ‘back to case’ button on the top right of the window or you can return to the window which stores all of the cases by going to the black coloured side bar and pressing ‘cases’).
You are in the ’Cast of Characters’ window – choose to either edit an existing character or to create a new character.
Create a new character by pressing +Add a character’ – a new window pops up asking you to name the character, enter a Bio for the character and a character type for the character. These three fields (Name of Character’; ‘Bio’; ‘Character type/use’)
+Add a character’ – below the +Add a character’ you will see a row of columns named ‘Name of Character’ / ‘Type of Character’ / Bio / ‘Order’ / ‘Actions’.
The order button will allow you to choose where on the timeline’s y-axis the character will appear – you will want the most important character to be prominent on the timeline.
Looking across the window from the pink ‘+Add a character’ button there are two search boxes – one allows you to search by type of character, the other to search by name of character. You can also delete a character using the last button on the row, which is the button next to the ‘edit’ button.
When you complete ‘Name of Character’ / ‘Type of Character’ / ‘Bio’ press ‘save’. When you press ‘save’ the window opens up with new fields – these are ‘Documents’; Facts/Events’; ‘Questions’; ‘Notes.
In this window you can now upload a document (‘Documents’); Add a Fact or Event (‘Add a fact/event’) or add a note or notes (‘Notes’) – what you can’t do at this stage is to add a question because questions belong in the presentation phase and this is the building the case phase i.e. the preparation phase – so questions come later.
This is one window which means to update any field you must scroll to the bottom of the window and press update – when you choose (for example) to add a fact, you will open a new window and any fact added must be saved in that window and when that window is closed, you must go to the bottom of the window and press update to save the information again.
Facts
In the window you can add a fact or event by going to the pink button ‘+Add a fact/event’ and pressing the button.
Under the pink button – ‘+Add a fact/event’ – are a search button and filter buttons.
The columns in the ‘Facts’ window are: ‘search facts’ in the first column, in the second column ‘type of fact’ (this refers to the designation of good fact/ bad fact); in the third column ‘issues’; and in the fourth column ‘critical’ (whether you have designated the facts as being critical to the issue which the facts go to prove).
‘+Add a fact/event’ – if you press ‘+Add a fact/event’ another window opens.
The idea behind ‘+Add a fact/event’ is that a character speaks to evidence and from the evidence the evidence which a fact-finder finds to be credible and reliable become ‘the facts of the case’.
In the preparation phase of the case the court lawyer must first identify the issues for proof and then identify and marshal the facts, which will support the proof of the issues (to get to the remedy sought after proof) – the facts are proven through the evidence presented to the fact-finder in the case.
‘+Add a fact/event’ – if you press ‘+Add a fact/event’ another window opens.
The ‘Add Fact’ window has the following fields ‘The Fact’; ‘Evidence’; ‘Date & Time’; ‘Good / Bad Fact’ & ‘Critical Fact’ – once these are populated press the pink ‘save’ button at the bottom left of the window.
When you populate these windows ( – ‘The Fact’; ‘Evidence’; ‘Date & Time’; ‘Good / Bad Fact’ & ‘Essential Fact’ – ) and press the pink save button the window expands to show the last two remaining fields for ‘Add a Fact/ event’ and you will also see pink buttons ‘+Add a question’ and ‘+Add a note’ and a pink button to update the page.
The last two fields ‘issues’ and ‘location’ must be completed. The ‘issues’ field should be populated and press return and it will save the issue – the location button does not allow you to save a location in the same way the ‘issues’ button does, but once a location is entered the system will save it if you press the update button at the bottom left of the window.
To save the information added (if you do not do this the location will not be saved) go tot the bottom of the page and press the pink update button.
When you press the pink save button it will take you to the ‘Edit character’ window – you will see the fact/event you have just entered displayed in the ‘+Add a fact/event’ section of the character’s window as a row with information populated under each column ( – ‘The Fact’; ‘Evidence’; ‘Date & Time’; ‘Good / Bad Fact’ & ‘Critical Fact’ – ).
You can edit that fact using the ‘edit’ button under ‘Actions’.
If you want to leave the character – press the pink update button.
The pink button will take you back to the ‘Cast of Characters’ window – from there, if you want to get back to the timeline press the button at the top right ‘back to case’ black button or, to edit the character, for example, the facts, press ‘edit’.
‘Case Management’ are the building blocks for the timeline of the case.
Go to the black coloured ‘building block’ black tabs and select ‘Acts & Scenes’.
A new window appears entitled ‘Acts’ and across from that a black coloured button ‘back to case’.
Underneath that is a pink button ‘+Add an Act’ and across from that is a search box to search through ‘Acts’.
Underneath is a banner ‘Act Name’ and across from that ‘Actions’.
Under that banner – once an Act is made – will be the name of the Act and buttons to edit the act or delete the Act.
To create an Act press the pink button ‘+Add an Act’ which brings up a window ‘Add act’.
Underneath is a help guide saying “Add a new act and relate it to a scene below. If you want to add a new scene, select ‘Add a scene’.
Add a name for the Act. You can then press ‘save’ at the bottom of the window – however, although that will save the Act it will not add the Act to the timeline because there has to be a scene added to the Act because ‘Acts & Scenes’ belong together and the only way to put an Act on the timeline is to complete an Act with a Scene.
After you create an Act & Scene – on the top line next to ‘Cases’ (i.e. the top banner) you will see the Act and Scene you are viewing on the timeline.
The good facts/ bad facts box allows the user to designate each fact as being helpful to proof of the issue it relates to (i.e. it supports the proposition that the fact-finder should find the issue in dispute proven by utilising that ‘Good Fact’) or unhelpful to proof of the (contentious) issue – the effect is that a good fact is coloured green on the barrel of the fact in the timeline and a bad fact is coloured red in the barrel of the fact on the timeline (and so are easily identifiable by colour coding on the timeline).
Under ‘Good Facts/ Bad Facts’ there is another box titled ‘essential’ fact – if you click this box it indicates that you think the (preceding Good/ Bad) fact is essential to proof of the issue and so it must be established at proof (it may be essential to the other side to prove and a bad fact can be essential on that basis).
Note – ‘Good Facts/ Bad Facts is less useful if you are using the ‘chapter of evidence’ approach but nevertheless (at present), populating that field is still mandatory.
FYI – all facts are set out in the ‘Add a Fact/event’ box in the character window as are all of the facts which are deemed to be essential facts; these are all viewable on the timeline using the timeline filters for ‘Good Fact/ Bad Fact’ and using ‘Essential Facts’.
These filters are designed to allow a user to know at a glance for each character the essential or material facts for proof of the issue and so for proof of the trial or cause – that is, in itself, a route map through proof of the facts to succeed at trial and so an invaluable feature of the app.
If you want to add or delete a location or issue you can go to the building blocks (the black coloured ‘tabs’) and add or delete an issue of location; if you are in the timeline you can view facts or events in the body of the timeline using issues or locations in the filter timeline banner or using the ‘swap characters/ Locations/ Issues’ above the timeline to see facts by issue or by location.
The app differentiates between navigating through a case on the timeline (this is done using the ‘Filter timeline’ banner which has the following buttons: ‘characters’; ‘from date’; ‘Acts’; ‘Locations’; ‘Issues’; ‘To Date’; ‘Scenes’; ‘Essential Facts’ – these buttons are all there to filter the view on the timeline. You can also filter the view on the timeline using the toggle button directly above the timeline ‘swap Characters/ Locations/ Issues’ and, or, in tandem with that toggle button another toggle button beside it which is ‘Character type’ (character type is ‘Leading Character/ Supporting’ Character or ‘Expert’ Character as an ‘Extra’ type character does not appear on the timeline and the filters are to allow the user to see different views of what is on the timeline.
The ‘building blocks’ of the case are the black coloured ‘tabs’ ‘Cast of characters’; ‘Acts & Scenes’; ‘Documents’; ‘Locations’; ‘Reports’; ‘Issues’; ‘Share Case’; ‘Case Management’ these are the building blocks for each case you build and the time-line of the case. These are not used to navigate the timeline – the timeline is navigated using the greyed out ‘Filter timeline’ banner with the filters ‘characters’; ‘from date’; ‘Acts’; ‘Locations’; ‘Issues’; ‘To Date’; ‘Scenes’; ‘Essential Facts’.
Looking to the black coloured background tabs (Cast of characters’; ‘Acts & Scenes’; ‘Documents’; ‘Locations’; ‘Reports’; ‘Issues’; ‘Share Case’; ‘Case Management’) what do ‘Documents’; ‘Reports’ & ‘Share Case’ do for the user?
‘Documents’ lets the user store all of the documents in the case without first having to attach a document to the case – usually the user would upload a document to the character but that is not the only way to upload a document to the system. You can then download and print off the document uploaded.
‘Reports’ relates to the ‘export’ button at the top right of the character window – if you press the black export button which has the writing before it “Export character report” – you will find all of the information you have written up for the character in ‘Reports’ window exported to the ‘Reports’ window.
If you have uploaded a document to the character you can download this separately to your laptop by pressing ‘download’ – if you want the material in a document printed, copy and paste the content into ‘evidence’ or ‘notes’ and it will be printed when you export the character and print off the character report.
What you will also see below the banner is the means for the user to populate a case with its component parts using – ‘Cast of characters’; ‘Acts & Scenes’; ‘Documents’; ‘Locations’; ‘Reports’; ‘Issues’; ‘Share Case’; ‘Case Management’, this allows the user to navigate the case by building the components of the case.
The ‘building blocks’ of the case, the ‘tabs’ ‘Cast of characters’; ‘Acts & Scenes’; ‘Documents’; ‘Locations’; ‘Reports’; ‘Issues’; ‘Share Case’; ‘Case Management’ are the building blocks for the time-line of the case.
The filters in the boxes below the building blocks (‘Cast of characters’; ‘Acts & Scenes’; ‘Documents’; ‘Locations’; ‘Reports’; ‘Issues’; ‘Share Case’; ‘Case Management’ ) which are ‘characters’; ‘from date’; ‘Acts’; ‘Locations’; ‘Issues’; ‘To Date’; ‘Scenes’; ‘Essential Facts’ are filters to let the user see what is available to them from the ‘building blocks’ on the time-line.
The ‘building blocks’ of the case, the ‘tabs’ ‘Cast of characters’; ‘Acts & Scenes’; ‘Documents’; ‘Locations’; ‘Reports’; ‘Issues’; ‘Share Case’; ‘Case Management’ are the building blocks for the timeline of the case and include an option to share your case with another subscriber.
To do so go to the ‘building blocks’ of the case, the ‘tabs’ ‘Cast of characters’; ‘Acts & Scenes’; ‘Documents’; ‘Locations’; ‘Reports’; ‘Issues’; ‘Share Case’ and press ‘Share Case’ which will open a new window titled ‘Transfer’ underneath that there is another pink button ‘Share Case’.
The two buttons are two different functions – one button Share Case’ will let you share a case with another subscriber if you are continuing to work on the case and you wish to collaborate with another lawyer on preparing the case or the client; the other button ‘Transfer’ will allow you to transfer a case to another BACKSHEET subscriber – use that if your involvement in the case is at an end but, you want to let the new lawyer have access to the work you have already done on the case. You can do either using your logon details – but to do so the recipient must be a BACKSHEET subscriber.
Go to the ‘building blocks’ of the case, the black coloured ‘tabs’ ‘Cast of characters’; ‘Acts & Scenes’; … ‘Case Management’ and press the tab case management.
Case Management is an internal messaging service only for the use of BACKSHEET subscribers – you can send a message to another subscriber about a case or save the message to send later as a draft. There is in the left hand side a notifications button letting you know if you have a new message – there is also a notifications button at the top right of the page, no matter which page you are in.
You will use the left side icons to access ‘cases’; the ‘Dashboard’ which is an audit trail of all your latest actions; to access ‘Messages’ which is the app’s internal and secure messaging service and ‘Notifications’ which allows you to see any messages sent to you from the internal messaging service.
At the bottom of the left hand side is the logout icon.
You can get started in one of two ways – either add a document to the app or create a character.
You will want to use the app to both set out the evidence available and to use the app as a diary to input when you anticipate consulting with the client and court appearances in the case etc.
A good starting point is to add a document.
It makes sense to add the foundation document for the trial, arbitration or mediation to the app at the outset, so it is available to you as you work through the evidence in the trial or arbitration or the facts of the mediation.
For example, you may wish to begin by adding a writ, a summons or a statement of claim, a complaint or an indictment etc. to the app.
Alternatively – you can begin by adding a character to the case, in which case you may wish to add to the character their witness statement – see adding a character.
Pricing
Our Backsheet solution is designed specifically for enterprise accounts, offering a customised approach to meet your unique business needs. To ensure you receive the most competitive and appropriate pricing, please contact us directly at info@backsheet.io for a personalised quote.
Use the code FRIENDS100 at sign-up to enjoy a 3-month free trial of Backsheet.
- Unlimited case creation (fair use)
- In-app messaging
- Share cases with BACKSHEET subscribers
BACKSHEET is an app designed by a trial lawyer – for trial lawyers.
BACKSHEET leverages digital technology to walk you, the trial lawyer, through the trial preparation process—because trials are ninety per cent preparation.
Well executed trial preparation handles presentation too — see below for how BACKSHEET can help you with that!
To help you prepare BACKSHEET provides a secure digital environment:
- to archive all of your case papers,
- in a single, secure digital place,
- if working in a team, to share the task of case preparation with other subscribers,
- in digital format,
- if you choose – export cases to other subscribers,
- message other subscribers securely, and
- share documents with other subscribers without transferring them outside of the secure digital environment.
Once trial preparation is done, you will turn to trial presentation.
The big idea is that a trial lawyer tells a story through the medium of witnesses, to persuade a fact finder in much the same way a screenwriter or playwright uses characters’ dialogue to explain the narrative, carry the action and ultimately, resolve the tension created in the story.
The key in a play or court room trial is how the narrative and action are organised and presented – how the action and narrative are choreographed by the director.
That choreography lies in Acts and Scenes.
This app lets you unfold your client’s case – plan how to present your client’s case at trial – in much the same way, by act and scene.
As the trial lawyer, you can choreograph the case for trial, witness by witness, issue by issue, and ultimately, fact by fact by approaching the case as an exercise in wrapping the issues for proof into Acts and Scenes.
Rather than divide the ‘issues for proof’ at trial into chapters of evidence, what would be chapters of evidence can be neatly broken into ‘Acts’ and the Acts into ‘Scenes’.
Once that is done, it is easy to determine which witnesses will best tell your client’s story in each scene—who will carry the narrative.
BACKSHEET is designed to let you, the trial lawyer, choreograph evidence by act and scene as a director would, when putting a story together and unfolding the story’s action for his audience (for the fact-finder).
Put less prosaically – BACKSHEET will effectively leverage your trial preparation and presentation by forcing you to identify the issues for proof, to succeed at trial and then collate the evidence supporting proof of that issue.
BACKSHEET encourages the user to deal with the issues act-by-act and evidence supporting each act (issue) scene-by-scene.
It is done this way: organise your trial into the issues for proof – the issues for proof are wrapped into the ‘Acts’ (‘Acts’ carry the issues for proof); ‘scenes’ carry the evidence for proof of the issue.
Plan to work through the witnesses at trial who will prove each issue (‘Act’) and use a scene, or scenes, to do so — if you wrap your issues into ‘acts’ and choose the evidence which will prove each ‘scene’ and by turn, each Act, that amounts to well executed trial preparation which will take care of trial presentation for the evidence, which will prove the issues for your client to succeed at trial!
A trial advocate works with witnesses, issues and facts – witnesses act in time and place, on other witnesses or documentary evidence, or physical evidence.
To the trial advocate a witness who is important is a witness who bears on factual causation and legal causation, because factual causation and legal causation comprise issues for proof to succeed in an action, or trial, or arbitration.
Witnesses & Evidence
BACKSHEET lets the subscriber add a witness (in BACKSHEET a ‘character’) to the timeline.
A ‘fact’ or an ‘event’ is anchored to a date and time, and anchored to a location tied to a character.
‘Fact’ v ‘’Event’
The timeline is for both ‘facts’ and ‘events’.
The difference between the two is that a ‘fact’ is a single adminicle of evidence, an event is a chapter heading for a group of a number of adminicles of evidence.
Another difference is the period of time each will occupy on the timeline – an event (a chapter of evidence, a heading for a group of facts) is spread over the time on the timeline which all of those facts took to take place in real time; the ‘facts’ (individual facts) are on the timeline for the period of time each took to take place in real time, i.e. a minute.
The user may decide to put a fact on the timeline if the user wishes to highlight a fact and identify it as a good fact or a bad fact (on the timeline), because its central to proof of the case.
The user may decide to put an ‘event’ on the timeline if the user wishes to chart the role of each witness for the trial in a ‘big picture’ way – so an ‘event’ is not a good fact or a bad fact on the timeline, highlighted as essential to proof of the cause, but more to show where a witness fits into the trial, for proof of the issues.
BACKSHEET puts all of the ‘facts’ or ‘events’ into a digital format (which can be printed out into a hard copy if you desire) – these factors drawn together can be a powerful route to understanding the fact-pattern of a case, the issues in a case and causation in a case.
BACKSHEET is a secure digital app for court lawyers to store, organise and analyse their cases, whether you are working on a case on your own or working as part of a team.
Only you—the user—have access to your case, unless you choose to invite other users to collaborate with you, or you want to ‘pass on’ a case to another user should you choose to ‘come out’ of a trial.
BACKSHEET has a timeline as its central organising principle.
The timeline pulls together the facts of your case.
If you choose, you can use BACKSHEET to choreograph your trial as a director of a screenplay might. The timeline lets you set out the order you will call your witnesses in, and it lets you put your witnesses into an ‘Acts & Scenes’ format: you can divide the action into acts and scenes in the same way a playwright would carry the narrative and action of his play for the intended audience through the players.
BACKSHEET will facilitate your collaboration with colleagues.
You can share documents on BACKSHEET securely within the digital eco-system without using third-party email.
BACKSHEET approaches the task of trial preparation and executes trial presentation in a unique way, unavailable anywhere else. This approach highlights gaps in the fact pattern and the relationships between facts in the fact pattern.
It is a super-quick way to interrogate the evidence and neatly wrap it under the ‘issues’ for proof.
A court is a place for people to tell their story.
Presenting a client’s story in a courtroom is left to the experienced trial lawyer.
It is always done through the medium of a witness, that is, through the evidence of a witness. BACKSHEET will facilitate you, the lawyer, in finding the most persuasive, compelling way of telling your client’s story and the most compelling way of carrying the narrative.
The name ‘BACKSHEET’ is derived from the traditions of the English Bar.
A barrister instructed to appear in a litigation received a brief.
The ‘backsheet’ wrapped that brief, tied-off neatly with a pink ribbon.
All briefs to counsel were presented in that way.
The name of the barrister, the cause of the action pursued or defended, and the name and address of solicitor and client, were all on the ‘backsheet’.
However, the information of real interest on the backsheet’ – the key piece of information, the must have, was the fee on offer to take the case!
A barrister’s clerk would not accept a brief unless there was a ‘backsheet’ – nothing happened with a brief unless it came with a ‘backsheet’!
The ‘backsheet’ was what piqued a barrister’s interest’: to the barrister, a ‘backsheet’ was an essential.
A litigation would not swing into action without it.
Therein lies the genesis of the name of this app.
The name evokes the idea of an essential, a pre-condition.
Before the litigation ‘call to action’ can be answered, there is a fundamental, which must first be in place.
A fundamental: what must first be in place before a litigation can swing into action? – BACKSHEET!
Founder’s note
Lawyers involved in resolving disputes know their answer lies at the scene of the crime – the place where the most significant interaction took place – or the correspondence, or an admission.
And getting to the answer is a process. A complex, multi-faceted process.
It is a discipline.
That discipline lies in a carefully honed ability to ‘walk around’ a fact pattern, a discipline calibrated to walk away from the facts that confirm and towards facts that dispute or challenge, facts that test: all the time organising, ordering, cataloguing facts by topic and facts by theme, or chronology, linking together, pulling apart.
For the whole of the matter at hand turns on trial preparation: it is the hinge on which, the door of proof swings open or shut; success or failure.
“… As everybody who has anything to do with the law well knows, the path of the law is strewn with examples of open and shut cases which, somehow, were not; of unanswerable charges which, in the event, were completely answered; of inexplicable conduct which was fully explained; of fixed and unalterable determinations that, by discussion, suffered a change…”
As Megarry J. observed (in his judgment in John v Rees [1969] 2 All ER 274 at 309); the path of the law is “strewn with examples” – examples of ‘reversals’.
Examples of a trial lawyer missing the mark entirely.
A ‘reversal’ for a trial lawyer is an unhappy moment – best avoided. It must trigger some soul searching: a re-examination of trial preparation – what was missed? What tested the case to destruction?
Trial preparation is a discipline; a rigorous and demanding one; that discipline forces me to ask of myself – what does trial preparation, properly undertaken, really involve?
For me, the answer is found in the process described by the former Lord Chancellor, Lord Herschell, who in my opinion, set ‘the bar’ for trial preparation:
“Claw the facts. Thus when preparing a chronological table of events as an aid to cross examination, counsel should not confine himself to events which bear directly upon the issues. He should include events which he may find it useful to refer to in lines of cross-examination related only to the credibility of witnesses, but he should go further, even that that. Within the limits of what is practical he should include, against their proper dates, events which seem, on the face of them to be mere pieces of indisputable history. It can well happen that while doing this, or when studying his table after he has completed it, counsel will see a probability or an improbability, a relationship or a truth which did not occur to him before and which would not have occurred to him if he had not assembled, perhaps from widely separated sources, the illuminating components. It may not be until that witness has begun to testify that the relevance appears. But whenever it does appear it may be of great value … “
And again, that puts me in mind of Megarry J.’s dictum in John v Rees; Lord Herschell implies the trial lawyer on the wrong side of Megarry J.’s reversals missed an ‘aha’ moment in trial preparation –
“… It may not be until that witness has begun to testify that the relevance appears. But whenever it does appear it may be of great value … “.
It’s hard to imagine Lord Herschell and his assiduous trial preparation ever on the wrong side of Megarry J.’s ‘examples’ because his emphasis on fact analysis and assessing the fact-pattern aided by a chronological table grinds away at the prospect of missing an ‘aha’ moment, of missing the mark – the process resolves the facts and the facts are the beating heart of a litigation; pressing the dictum of Megarry J. into service once more “… As everybody who has anything to do with the law well knows, …” facts win cases!
Lord Herschell urges ‘claw the facts’ – because facts win cases.
Facts win cases because facts persuade. Facts explain. Facts pave the road to a logical deduction, or an unanswerable conclusion. Facts test your opponent’s case.
Facts are stubborn things.
Claw the facts – the stubborn things – because ‘stubborn things’ prevail.
Lord Herschell’s thorough treatment of his raw material (‘claw the facts’) and his thoughtful analysis (a ‘chronological table’) “assembled … from widely separated sources”, the scene of the crime or the correspondence, certainly does not appear to belong on the wrong side of Megarry J.’s ‘reversals’.
It’s worth repeating – it’s hard to imagine Lord Herschell and his assiduous trial preparation ever on the wrong side of Megarry J.’s ‘examples’.
If I am right in thinking that Lord Herschell would not find himself on the wrong side of Megarry J.’s reversals, then common sense dictates, his approach to trial preparation must comprise a competitive advantage for trial lawyers who choose to do likewise.
The reason it is hard to imagine Lord Herschell ever on the wrong side of Megarry J.’s ‘examples’, lies in his approach to trial preparation – his trial preparation is a discipline.
Lord Herschell’s discipline lies in his ‘first commandment’ – ‘claw the facts’ and an ‘essential step’, a ‘chronological table’.
The question I ask of myself is two-fold: can I acquire that ‘discipline’ and if so, is there a tool to help me?
I couldn’t find that tool, that digital app, to help me do so. So, I designed and built BACKSHEET to work through Lord Herschell’s first commandment – ‘claw the facts’ and his essential step, create a timeline (a ‘chronological table’).
This app is an efficient, quick, and effective digital route to apply the ‘discipline’ of Lord Herschell’s trial preparation: it lets me quickly interrogate the evidence and press that evidence into service by ‘threading the legal needle’ of ‘issues for proof’.
May I say that I’ve been using this app for some time now, and I wouldn’t want to do the work of a trial lawyer without it — it’s intuitive and the app brilliantly leverages my work effort by letting me get all of the facts and my case analysis, into one secure digital place.
This app lets me do the same quantity of work in less time; or do more work in the same time.
My work product is leveraged by the app because it is digital – it can be configured and reconfigured to reflect the ever-changing fact-pattern of a litigation landscape.
As a postscript – Lord Herschell implies the trial lawyer who ‘claws the facts’ will be the master of the facts and mastering the facts garners foresight and insight; foresight as to what lies down the road of a litigation and insight into the issues for litigation.
By extension, trial lawyers who enjoy foresight and insight suffer fewer reversals!
Lord Herschell plainly achieved the trial lawyers’ trifecta – he enjoyed the confidence of the court, the trust of his client and the respect of his opponent.
All through a trial preparation process so rigorous it distils issues for trial into a product, which amounts to a competitive advantage in the courtroom. Lord Herschell must have been a formidable court room opponent – a trial lawyer whose trial preparation enabled him to enjoy a competitive advantage over an opponent at trial before judge and jury. First class preparation in chambers and so first-class presentation at trial.
I designed this app, inspired by Lord Herschell, because he ’set the bar’, the gold standard for trial preparation; his ‘discipline’ in trial preparation is first-class, so well calibrated, so robust, that emulating it really can drive away the ‘examples’ of Megarry J. – ‘reversals’ so rightly feared by the trial lawyer.
I designed this app for me, to ‘claw the facts’ and to set them in a ‘chronological table’ as modelled by Lord Herschell.
And there it is – trial preparation is the trial lawyer’s teacher; preparation ‘pays its dues’, a competitive advantage in the court room before judge and jury and fewer reversals in judgments.
It bears gifts for the prepared – insight and foresight.
One cannot help but think that hindsight too is a teacher.
I designed this app because I don’t want her to be mine!
Don’t let her be yours – ‘claw the facts’ & prepare to succeed!
David Ross MacLeod,
Founder
“ … the adversarial system is the finest system in the world
– if the advocates are first class ”*
First class advocacy begins with ‘clawing the facts’ – prepare to succeed!
*Hanley, Robert F. “A Conversation with Richard DuCann.” Litigation, vol. 14, no. 3, American Bar Association, 1988, pp. 21–60